Conecte modelos C++ à sua interface de usuário QML
Dados do backend C++ para o frontend QML
Conforme demonstrado no tutorial anterior, você pode conectar código C++ ao QML criando uma classe que será tratada como apenas mais um componente em QML. No entanto, você pode querer representar dados mais complexos, como dados que precisam atuar como um ListModel personalizado ou que, de alguma forma, precisam ser delegados de um Repetidor.
Podemos criar nossos próprios modelos do lado C++ e declarar como os dados desse modelo devem ser representados no frontend QML.
globalDrawer:Kirigami.GlobalDrawer{isMenu:trueactions:[Kirigami.Action{text:i18n("Exposing to QML")icon.name:"kde"onTriggered:pageStack.push(Qt.createComponent("org.kde.tutorial.components","ExposePage"))},Kirigami.Action{text:i18n("C++ models in QML")icon.name:"kde"onTriggered:pageStack.push(Qt.createComponent("org.kde.tutorial.components","ModelsPage"))},Kirigami.Action{text:i18n("Quit")icon.name:"application-exit-symbolic"shortcut:StandardKey.QuitonTriggered:Qt.quit()}]}
Em seguida, crie um novo arquivo src/components/ModelsPage.qml com o seguinte conteúdo:
1
2
3
4
5
6
7
8
9
importQtQuickimportQtQuick.LayoutsimportQtQuick.ControlsasControlsimportorg.kde.kirigamiasKirigamiKirigami.ScrollablePage{title:"C++ models in QML"// ...
}
E, por fim, adicione-o ao arquivo src/components/CMakeLists.txt:
Esta será a tela de fundo para esta página de tutorial.
Usando strings brutas
Para facilitar a compreensão de como o modelo é povoado neste tutorial, desativaremos um recurso que os aplicativos KDE que usam módulos CMake extras (ECM) utilizam por padrão, que otimiza o código de string. Isso nos permite evitar a necessidade de escrever QStringLiteral() sempre que uma string for introduzida em nosso código C++, o que será útil para o código no arquivo de cabeçalho a seguir.
No arquivo CMakeLists.txt raiz, adicione o seguinte:
Desativar essa flag do CMake é feito apenas para fins didáticos. O código de produção deve usar QStringLiteral() ou o namespace de literais de string do Qt sempre que possível.
Preparando a Classe
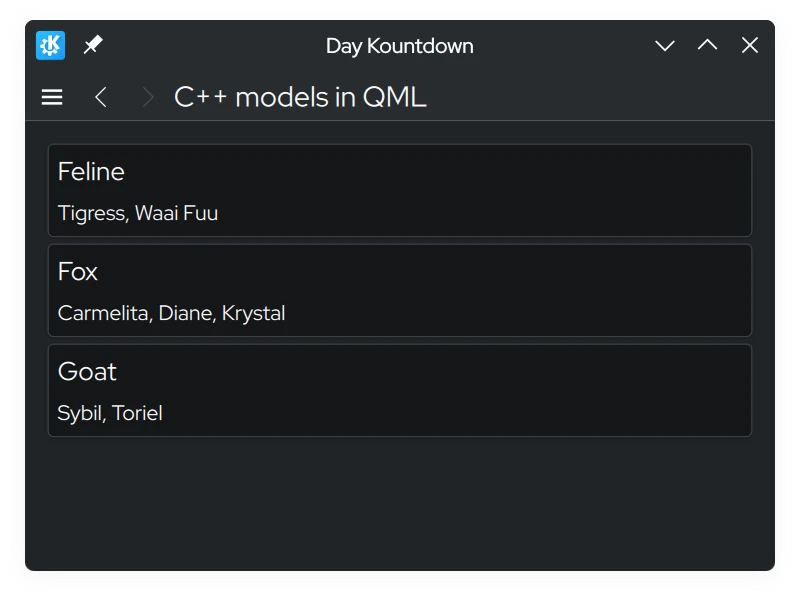
Criaremos uma classe que contém um QMap, onde um QString é usado como chave e objetos QStringList são usados como valores. O frontend poderá ler e exibir as chaves e os valores, sendo simples de usar como um array unidimensional. Deverá ter uma aparência semelhante a um ListModel do QML.
Para fazer isso, precisamos criar uma classe que herda de QAbstractListModel. Vamos também adicionar alguns dados ao QMap. Essas declarações estarão localizadas em model.h.
Crie dois novos arquivos, src/components/model.h e src/components/model.cpp.
Adicione esses dois novos arquivos ao arquivo src/components/CMakeLists.txt:
Adicione o seguinte como conteúdo inicial ao arquivo src/components/model.h:
 1
 2
 3
 4
 5
 6
 7
 8
 9
10
11
12
13
14
15
16
17
#pragma once
#include<QAbstractListModel>#include<qqmlintegration.h>classModel:publicQAbstractListModel{Q_OBJECTQML_ELEMENTpublic:private:QMap<QString,QStringList>m_list={{"Feline",{"Tigress","Waai Fuu"}},{"Fox",{"Carmelita","Diane","Krystal"}},{"Goat",{"Sybil","Toriel"}}};};
É claro que não podemos simplesmente exibir essa classe como está. Também precisamos informar ao QML como representar esses dados na classe. Podemos fazer isso sobrescrevendo três funções virtuais essenciais:
rowCount() - Pense nesta função como uma forma de dizer ao QML quantos itens o modelo deve apresentar.
roleNames() - Você pode pensar nos nomes de funções como nomes de propriedades associados a dados em QML. Esta função permite criar essas funções.
data() - Esta função é chamada quando você deseja recuperar os dados que correspondem aos nomes das funções do modelo.
Nota
Os nomes de funções personalizados criados por roleNames() só podem ser usados quando um modelo está sendo delegado e não podem ser usados fora dele. Consulte Modelos e Visualizações.
Nota
Tecnicamente, os modelos no Qt são representados como tabelas, com linhas e colunas. Portanto, o que sobrescrever rowCount() faz é informar ao Qt quantas linhas existem em um modelo. Como estamos lidando apenas com um array unidimensional neste tutorial, você pode pensar em "linhas" como "número de elementos".
Substituindo e implementando rowCount()
Vamos sobrescrever a função no arquivo de cabeçalho src/components/model.h. A função rowCount() vem com seu próprio parâmetro, mas ele não será usado neste exemplo e, portanto, não precisa ser nomeado.
 1
 2
 3
 4
 5
 6
 7
 8
 9
10
11
12
13
14
15
16
17
18
#pragma once
#include<QAbstractListModel>#include<qqmlintegration.h>classModel:publicQAbstractListModel{Q_OBJECTQML_ELEMENTpublic:introwCount(constQModelIndex&)constoverride;private:QMap<QString,QStringList>m_list={{"Feline",{"Tigress","Waai Fuu"}},{"Fox",{"Carmelita","Diane","Krystal"}},{"Goat",{"Sybil","Toriel"}}};};
Então, vamos declarar quantas linhas existem neste modelo em src/components/model.cpp.
Antes de sobrescrevermos roleNames(), precisamos declarar quais são as funções no lado C++ usando um enum público. A razão para isso é que esses valores de enum são passados para data() sempre que o QML acessa uma função correspondente e, portanto, podemos fazer com que data() retorne o que desejamos.
Vamos começar criando o enum para funções em src/components/model.h, onde cada valor é uma função para o lado C++.
#pragma once
#include<QAbstractListModel>#include<qqmlintegration.h>classModel:publicQAbstractListModel{Q_OBJECTQML_ELEMENTpublic:enumRoles{SpeciesRole=Qt::UserRole,CharactersRole};QHash<int,QByteArray>roleNames()constoverride;introwCount(constQModelIndex&)constoverride;private:QMap<QString,QStringList>m_list={{"Feline",{"Tigress","Waai Fuu"}},{"Fox",{"Carmelita","Diane","Krystal"}},{"Goat",{"Sybil","Toriel"}}};};
Uma vez que tenhamos isso definido, podemos finalmente criar quais são essas funções no lado QML usando um QHash onde as chaves são os valores enumerados pareados com QByteArrays. Isso deve ir para src/components/model.cpp. O texto em QByteArray é o que é usado no código QML propriamente dito.
Em nosso modelo de exemplo, a função "species" pode ser usada para recuperar a chave QString "Feline", "Fox", "Goat", cada uma em um delegado separado. O mesmo pode ser feito com os valores de QStringList para a lista de nomes de personagens.
Substituindo e implementando data()
Existem dois parâmetros que são passados para data(): index e role. O index é a posição dos dados no modelo. Como mencionado anteriormente, role é usado pelo QML para obter dados específicos retornados quando ele está acessando uma função.
Em data(), podemos usar uma instrução switch para retornar os dados apropriados e o tipo de dados, dependendo da função, o que é possível, pois data() retorna um QVariant. Ainda precisamos garantir que obtemos a localização apropriada dos dados. Neste exemplo abaixo, você pode ver que uma nova variável iteradora está sendo declarada, que é definida a partir do início da lista mais a linha do índice e os dados para os quais o iterador está apontando são o que está sendo retornado.
No entanto, não podemos simplesmente retornar os dados que quisermos. Podemos estar tentando vincular dados a uma propriedade com um tipo de dado incompatível, como uma QStringList a uma QString. Talvez seja necessário converter os dados para que eles sejam exibidos corretamente. Para isso, criamos uma nova função privada e estática chamada formatList().
Isso resulta no seguinte código em src/components/model.cpp:
#pragma once
#include<QAbstractListModel>#include<qqmlintegration.h>classModel:publicQAbstractListModel{Q_OBJECTQML_ELEMENTpublic:enumRoles{SpeciesRole=Qt::UserRole,CharactersRole};introwCount(constQModelIndex&)constoverride;QHash<int,QByteArray>roleNames()constoverride;QVariantdata(constQModelIndex&index,introle)constoverride;private:QMap<QString,QStringList>m_list={{"Feline",{"Tigress","Waai Fuu"}},{"Fox",{"Carmelita","Diane","Krystal"}},{"Goat",{"Sybil","Toriel"}}};staticQStringformatList(constQStringList&list);};
Uso de Classe no QML
O arquivo QML utilizado conterá apenas três componentes Kirigami.AbstractCard, onde a chave é o cabeçalho e o valor é o conteúdo. Esses cards são criados delegando um AbstractCard usando um repetidor, onde o modelo personalizado que criamos atua como modelo. Os dados são acessados usando a palavra model, seguida pelas funções que declaramos em roleNames().
importQtQuickimportQtQuick.LayoutsimportQtQuick.ControlsasControlsimportorg.kde.kirigamiasKirigamiKirigami.ScrollablePage{title:"C++ models in QML"Model{id: customModel}ColumnLayout{anchors.left:parent.leftanchors.right:parent.rightRepeater{model:customModeldelegate:Kirigami.AbstractCard{header:Kirigami.Heading{text:model.specieslevel:2}contentItem:Controls.Label{text:model.characters}}}}}
Modificação de dados
Editando dados usando dataChanged() e setData()
Você pode se deparar com uma situação em que deseja modificar dados no modelo e ter as alterações refletidas no frontend. Toda vez que alteramos dados no modelo, devemos emitir o sinal dataChanged(), que aplicará essas alterações no frontend nas células específicas especificadas em seus argumentos. Neste tutorial, podemos simplesmente usar o argumento index de setData().
setData() é uma função virtual que você pode sobrescrever para que a modificação dos dados no lado do frontend seja refletida automaticamente no lado do backend. Ela requer três parâmetros:
index - A localização dos dados.
value - O conteúdo dos novos dados.
role - Neste contexto, a função aqui é usada para informar às visualizações como elas devem lidar com os dados. A função aqui deve ser Qt::EditRole.
O parâmetro role neste caso é usado para garantir que setData() possa ser editado por meio de entrada do usuário (Qt::EditRole). Usando index, podemos usá-lo para determinar o local onde os dados devem ser editados com o conteúdo de value.
#pragma once
#include<QAbstractListModel>#include<qqmlintegration.h>classModel:publicQAbstractListModel{Q_OBJECTQML_ELEMENTpublic:enumRoles{SpeciesRole=Qt::UserRole,CharactersRole};introwCount(constQModelIndex&)constoverride;QHash<int,QByteArray>roleNames()constoverride;QVariantdata(constQModelIndex&index,introle)constoverride;boolsetData(constQModelIndex&index,constQVariant&value,introle)override;private:QMap<QString,QStringList>m_list={{"Feline",{"Tigress","Waai Fuu"}},{"Fox",{"Carmelita","Diane","Krystal"}},{"Goat",{"Sybil","Toriel"}}};staticQStringformatList(constQStringList&list);};
Vamos atualizar o código QML para que possamos abrir um prompt que nos permita editar o modelo usando um Botão de controle anexado aos cartões.
Adicione o seguinte Kirigami.PromptDialog ao arquivo src/components/ModelsPage.qml, juntamente com um novo botão de edição:
importQtQuickimportQtQuick.LayoutsimportQtQuick.ControlsasControlsimportorg.kde.kirigamiasKirigamiimportorg.kde.tutorial.componentsKirigami.ScrollablePage{title:"C++ models in QML"Model{id: customModel}ColumnLayout{anchors.left:parent.leftanchors.right:parent.rightRepeater{model:customModeldelegate:Kirigami.AbstractCard{Layout.fillHeight:trueheader:Kirigami.Heading{text:model.specieslevel:2}contentItem:Item{implicitWidth:delegateLayout.implicitWidthimplicitHeight:delegateLayout.implicitHeightColumnLayout{id: delegateLayoutControls.Label{text:model.characters}Controls.Button{text:"Edit"onClicked:{editPrompt.text=model.characters;editPrompt.model=model;editPrompt.open();}}}}}}}Kirigami.PromptDialog{id: editPromptpropertyvarmodelpropertyaliastext:editPromptText.texttitle:"Edit Characters"standardButtons:Kirigami.Dialog.Ok|Kirigami.Dialog.CancelonAccepted:{constmodel=editPrompt.model;model.characters=editPromptText.text;editPrompt.close();}Controls.TextField{id: editPromptTextonAccepted:editPrompt.accept()}}}
Agora, sempre que os valores do modelo forem alterados no frontend, as alterações devem ser atualizadas automaticamente no backend.
Adicionando linhas
Adicionamos uma maneira de modificar os dados nas chaves existentes do QMap e, no front-end, isso se reflete na modificação do conteúdo dentro dos AbstractCards. Mas e se precisarmos adicionar uma nova entrada de chave no QMap e refletir isso no lado QML? Vamos fazer isso criando um novo método que pode ser chamado no lado QML para executar essa tarefa.
Para tornar o método visível em QML, devemos começar a declaração do método com a macro Q_INVOKABLE. Este método também incluirá um parâmetro de string, que se destina a ser a nova chave no QMap.
#pragma once
#include<QAbstractListModel>#include<qqmlintegration.h>classModel:publicQAbstractListModel{Q_OBJECTQML_ELEMENTpublic:enumRoles{SpeciesRole=Qt::UserRole,CharactersRole};introwCount(constQModelIndex&)constoverride;QHash<int,QByteArray>roleNames()constoverride;QVariantdata(constQModelIndex&index,introle)constoverride;Q_INVOKABLEvoidaddSpecies(constQString&species);private:QMap<QString,QStringList>m_list={{"Feline",{"Tigress","Waai Fuu"}},{"Fox",{"Carmelita","Diane","Krystal"}},{"Goat",{"Sybil","Toriel"}}};staticQStringformatList(constQStringList&list);};
Dentro deste método, precisamos informar ao Qt que queremos criar mais linhas no modelo. Isso é feito chamando beginInsertRows() para iniciar nossa operação de adição de linhas, seguida pela inserção do que for necessário e, em seguida, usando endInsertRows() para finalizar a operação. No entanto, ainda precisamos emitir dataChanged() no final. Desta vez, vamos atualizar todas as linhas, da primeira à última, pois o QMap pode se reorganizar em ordem alfabética, e precisamos capturar isso em todas as linhas.
Ao chamar beginInsertRows(), precisamos primeiro passar uma classe QModelIndex para especificar o local onde as novas linhas devem ser adicionadas, seguido de quais serão os novos números da primeira e da última linha. Neste tutorial, o primeiro argumento será apenas QModelIndex(), pois não há necessidade de usar o parâmetro aqui. Podemos usar apenas o tamanho da linha atual para o número da primeira e da última linha, pois adicionaremos apenas uma linha no final do modelo.
A função dataChanged() usa QModelIndex como tipo de dado para seus parâmetros. No entanto, podemos converter inteiros em tipos de dados QModelIndex usando a função index().
Vamos atualizar o código QML para que possamos adicionar uma nova chave ao QMap.
importQtQuickimportQtQuick.LayoutsimportQtQuick.ControlsasControlsimportorg.kde.kirigamiasKirigamiimportorg.kde.tutorial.componentsKirigami.ScrollablePage{title:"C++ models in QML"actions:[Kirigami.Action{icon.name:"list-add-symbolic"text:"Add New Species"onTriggered:{addPrompt.open();}}]Model{id: customModel}ColumnLayout{// ...
}Kirigami.PromptDialog{id: addPrompttitle:"Add New Species"standardButtons:Kirigami.Dialog.OkonAccepted:{customModel.addSpecies(addPromptText.text);addPromptText.text="";// Clear TextField every time it's done
addPrompt.close();}Controls.TextField{id: addPromptTextLayout.fillWidth:trueonAccepted:addPrompt.accept()}}Kirigami.PromptDialog{id: editPrompt// ...
}}
Agora, devemos receber uma nova ação na parte superior do aplicativo que abre um prompt que permite adicionar um novo elemento ao modelo, com nossos próprios dados personalizados.
Removendo linhas
A maneira de remover linhas é semelhante à de adicionar linhas. Vamos criar outro método que chamaremos em QML. Desta vez, usaremos um parâmetro adicional, que é um inteiro que representa o número da linha. O nome da espécie é usado para excluir a chave do QMap, enquanto o número da linha será usado para excluir a linha no front-end.
Adicione uma nova função Q_INVOKABLE chamada deleteSpecies() em src/components/model.h:
#pragma once
#include<QAbstractListModel>#include<qqmlintegration.h>classModel:publicQAbstractListModel{Q_OBJECTQML_ELEMENTpublic:enumRoles{SpeciesRole=Qt::UserRole,CharactersRole};introwCount(constQModelIndex&)constoverride;QHash<int,QByteArray>roleNames()constoverride;QVariantdata(constQModelIndex&index,introle)constoverride;Q_INVOKABLEvoidaddSpecies(constQString&species);Q_INVOKABLEvoiddeleteSpecies(constQString&speciesName,constint&rowIndex);private:QMap<QString,QStringList>m_list={{"Feline",{"Tigress","Waai Fuu"}},{"Fox",{"Carmelita","Diane","Krystal"}},{"Goat",{"Sybil","Toriel"}}};staticQStringformatList(constQStringList&list);};
Com uma implementação correspondente em src/components/model.cpp:
Agora, vamos atualizar o aplicativo para que um botão "Excluir" apareça em um RowLayout ao lado do botão de edição dentro do nosso AbstractCard e conectá-lo ao nosso método de exclusão.
importorg.kde.kirigamiasKirigamiimportorg.kde.tutorial.componentsKirigami.Page{title:"Exposing to QML Tutorial"Kirigami.Heading{anchors.centerIn:parenttext:Backend.introductionText}}
src/components/backend.h
1
2
3
4
5
6
7
8
9
10
11
12
13
14
15
16
17
18
19
#pragma once
#include<QObject>#include<qqmlintegration.h>classBackend:publicQObject{Q_OBJECTQML_ELEMENTQML_SINGLETONQ_PROPERTY(QStringintroductionTextREADintroductionTextWRITEsetIntroductionTextNOTIFYintroductionTextChanged)public:explicitBackend(QObject*parent=nullptr);QStringintroductionText()const;voidsetIntroductionText(constQString&introductionText);Q_SIGNALvoidintroductionTextChanged();private:QStringm_introductionText=QStringLiteral("Hello World!");};
importQtQuickimportQtQuick.LayoutsimportQtQuick.ControlsasControlsimportorg.kde.kirigamiasKirigamiimportorg.kde.tutorial.componentsKirigami.ScrollablePage{title:"C++ models in QML"actions:[Kirigami.Action{icon.name:"list-add-symbolic"text:"Add New Species"onTriggered:{addPrompt.open();}}]Model{id: customModel}ColumnLayout{anchors.left:parent.leftanchors.right:parent.rightRepeater{model:customModeldelegate:Kirigami.AbstractCard{Layout.fillHeight:trueheader:Kirigami.Heading{text:model.specieslevel:2}contentItem:Item{implicitWidth:delegateLayout.implicitWidthimplicitHeight:delegateLayout.implicitHeightColumnLayout{id: delegateLayoutControls.Label{text:model.characters}RowLayout{Layout.fillWidth:trueControls.Button{text:"Edit"onClicked:{editPrompt.text=model.characters;editPrompt.model=model;editPrompt.open();}}Controls.Button{text:"Delete"onClicked:{customModel.deleteSpecies(model.species,index);}}}}}}}}Kirigami.PromptDialog{id: addPrompttitle:"Add New Species"standardButtons:Kirigami.Dialog.OkonAccepted:{customModel.addSpecies(addPromptText.text);addPromptText.text="";// Clear TextField every time it's done
addPrompt.close();}Controls.TextField{id: addPromptTextLayout.fillWidth:trueonAccepted:addPrompt.accept()}}Kirigami.PromptDialog{id: editPromptpropertyvarmodelpropertyaliastext:editPromptText.texttitle:"Edit Characters"standardButtons:Kirigami.Dialog.Ok|Kirigami.Dialog.CancelonAccepted:{constmodel=editPrompt.model;model.characters=editPromptText.text;editPrompt.close();}Controls.TextField{id: editPromptTextonAccepted:editPrompt.accept()}}}
#pragma once
#include<QAbstractListModel>#include<qqmlintegration.h>classModel:publicQAbstractListModel{Q_OBJECTQML_ELEMENTpublic:enumRoles{SpeciesRole=Qt::UserRole,CharactersRole};introwCount(constQModelIndex&)constoverride;QHash<int,QByteArray>roleNames()constoverride;QVariantdata(constQModelIndex&index,introle)constoverride;boolsetData(constQModelIndex&index,constQVariant&value,introle)override;Q_INVOKABLEvoidaddSpecies(constQString&species);Q_INVOKABLEvoiddeleteSpecies(constQString&speciesName,constint&rowIndex);private:QMap<QString,QStringList>m_list={{"Feline",{"Tigress","Waai Fuu"}},{"Fox",{"Carmelita","Diane","Krystal"}},{"Goat",{"Sybil","Toriel"}}};staticQStringformatList(constQStringList&list);};