Ustawienia środowiska i pierwsze kroki
Installing Kirigami
Before getting started, we will need to install Kirigami on our machine. There are three ways to do so:
- Installing Kirigami from the repositories in your Linux distribution
- Building Kirigami with kdesrc-build
- Installing Kirigami with Craft
Installing Kirigami from the repositories in your Linux distribution
We need a C++ compiler, Qt development packages, and Kirigami. Open a terminal application and run one of the following, depending on which Linux distribution you are using:
 Manjaro Manjaro Arch Arch | sudo pacman -S base-devel extra-cmake-modules cmake kirigami ki18n kcoreaddons breeze kiconthemes qt6-base qt6-declarative qqc2-desktop-style |
 OpenSUSE OpenSUSE | sudo zypper install cmake kf6-extra-cmake-modules kf6-kirigami-devel kf6-ki18n-devel kf6-kcoreaddons-devel kf6-kiconthemes-devel qt6-base-devel qt6-declarative-devel qt6-quickcontrols2-devel qqc2-desktop-style |
 Fedora Fedora | sudo dnf groupinstall "Development Tools" "Development Libraries" sudo dnf install cmake extra-cmake-modules kf6-kirigami2-devel kf6-ki18n-devel kf6-kcoreaddons-devel kf6-kiconthemes-devel qt6-qtbase-devel qt6-qtdeclarative-devel qt6-qtquickcontrols2-devel qqc2-desktop-style |
Further information for other distributions can be found here.
If you wish to build Kirigami with Qt6, it is recommended to use kdesrc-build instead, especially for Linux installations using Plasma 5.
Building Kirigami with kdesrc-build
KDE has a custom tool to easily build all of its libraries and programs: kdesrc-build. It can be used to build Kirigami on Linux and FreeBSD.
For this tutorial, you will need to follow the setup instructions for kdesrc-build.
After that, you may simply run the following on a terminal:
kdesrc-build kirigami kcoreaddons ki18n breeze plasma-integration kiconthemes qqc2-desktop-styleInstalling Kirigami with Craft
KDE has a custom tool to easily install most of its libraries and programs: Craft. It can be used to install Kirigami on Linux, FreeBSD, Windows, Android and macOS.
You will need to follow the setup instructions for Craft. By the end of the setup, you should have run an environment setup file (craftenv.ps1 or craftenv.sh), which will give you a terminal shell where you will be compiling your Kirigami application.
After that, you may simply run the following on a terminal:
craft kirigami kcoreaddons ki18n breeze kiconthemes qqc2-desktop-styleIf you close your terminal, you can simply run the environment setup file again to compile your app.
Struktura projektu
Mimo że istnieją narzędzia, które umożliwiają łatwe stworzenie tych plików, to my stworzymy je ręcznie. Ułatwi nam to zrozumienie części, które będą się składać na nasza nową aplikację.
First we create our project folder (you can use the commands below). We are going to call ours kirigami-tutorial/.
kirigami-tutorial/
├── CMakeLists.txt
├── org.kde.tutorial.desktop
└── src/
    ├── CMakeLists.txt
    ├── main.cpp
    └── Main.qml
Within this folder we are going to create a src/ folder and CMakeLists.txt. It is generally considered good practice to place all our main C++ code files in a src/ folder. We also put the Main.qml file in it since it will be run together with the executable.
Podpowiedź
You can quickly create this file structure with:
mkdir -p kirigami-tutorial/src
touch kirigami-tutorial/{CMakeLists.txt,org.kde.tutorial.desktop}
touch kirigami-tutorial/src/{CMakeLists.txt,main.cpp,Main.qml}
Uwaga
In case you want to automatically build the project with kde-builder/kdesrc-build, custom module name should be the same as the project root folder (in our case it will be "kirigami-tutorial"), otherwise you would need to customize thesource-dir or dest-dir for the module. We will assume the path to your main.cpp will be ~/kde/src/kirigami-tutorial/src/main.cpp.Main.qml
| |
To miejsce, w którym będziemy obsługiwać przód naszej aplikacji.
If you know some Javascript, then much of QML will seem familiar to you (though it does have its own peculiarities). Qt's documentation has an extensive amount of material on this language if you feel like trying something on your own. Over the course of these tutorials we will be focusing much of our attention on our QML code, where we can use Kirigami to get the most out of it.
For now, let's focus on Main.qml. First we import a number of important modules:
- QtQuick, the standard library used in QML applications.
- QtQuick Controls, which provides a number of standard controls we can use to make our applications interactive.
- QtQuick Layouts, which provides tools for placing components within the application window.
- Kirigami , which provides a number of components suited for creating applications that work across devices of different shapes and sizes.
Uwaga
Putting the QtQuick Controls and Kirigami imports into separate namespaces using theas keyword is a best practice that ensures no components with the same name can conflict. You might see different names for QtQuick Controls in the wild, such as "QQC" or "QQC2". We will be using "Controls" in this tutorial for clarity.We then come to our base element, Kirigami.ApplicationWindow , which provides some basic features needed for all Kirigami applications. This is the window that will contain each of our pages, the main sections of our UI.
We then set the window's id property to "root". IDs are useful because they let us uniquely reference a component, even if we have several of the same type.
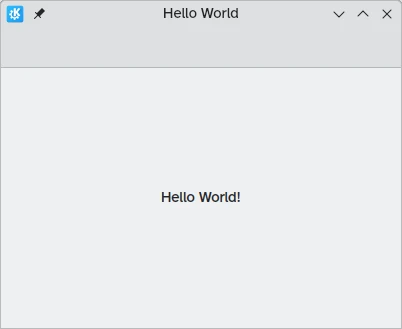
We also set the window title property to "Hello World". You'll notice that we have wrapped our "Hello World" string in a function called i18nc(), where we detail the context of the string as well as the string itself.
Uwaga
i18n() functions make your app more easily translatable, as they return a version of the provided string in the user's language (as long as your app has been localised for that language). While an English user might see our window title as "Hello World", a Spanish user would see "Hola Mundo".
i18nc() builds on the i18n() function by allowing developers to provide some context to translators working on the app. Here we clarify that the UI component is the title of the application window, so we have included the string "@title:window" before "Hello World". See the Ki18n Programmer's guide for more details.
We then set the first page of our page stack. Most Kirigami applications are organised as a stack of pages, each page containing related components suited to a specific task. For now, we are keeping it simple, and sticking to a single page.
pageStack
is an initially empty stack of pages provided by
Kirigami.ApplicationWindow
, and with pageStack.initialPage: Kirigami.Page {...} we set the first page presented upon loading the application to a
Kirigami.Page
. This page will contain all our content.
Finally, we include in our page a
Controls.Label
that lets us place text on our page. We use anchors.centerIn: parent to center our label horizontally and vertically within our parent element. In this case, the parent component of our label is
Kirigami.Page
. The last thing we need to do is set its text: text: i18n("Hello World!").
org.kde.tutorial.desktop
The primary purpose of Desktop Entry files is to show your app on the application launcher on Linux. Another reason to have them is to have window icons on Wayland, as they are required to tell the compositor "this window goes with this icon".
It must follow a reverse-DNS naming scheme followed by the .desktop extension such as org.kde.tutorial.desktop:
| |
CMakeLists.txt
CMakeLists.txt files are needed to use KDE's build system of choice, CMake. Our kirigami-tutorial/CMakeLists.txt file is going to specify some of our application's characteristics. It also includes some of the dependencies we need in order to compile our project.
| |
The CMakeLists.txt defines how to build your projects. Most of the content here is just to bootstrap your project. You can read a line-by-line, in-depth explanation of what this CMakeLists file does here.
The most important thing to keep in mind is that the C++ build dependencies of Qt and KDE Frameworks are managed with find_package() and QML runtime dependencies are managed with ecm_find_qml_module(). You will have to modify these lines and include any additional components that you decide to use during the development of your application.
The line with add_subdirectory(src) points CMake to the kirigami-tutorial/src/ directory, where our source code is located.
The line with install() tells CMake where to install the desktop file.
Let's delve into the kirigami-tutorial/src/CMakeLists.txt file in there.
| |
This file consists of five steps:
- create an executable
- change the executable into a QML module that accepts QML files
- add C++ and QML files to the executable
- link the libraries necessary for the executable to run
- install the executable to the right place
Next time you need to add more QML files, add them to the existing ecm_target_qml_sources() call. C++ files that use the QML_ELEMENT keyword which we will see later in the tutorial can be added using target_sources().
Teraz zajęliśmy się CMake, więc spójrzmy na pliki, nad którymi będziemy pracować przez większość czasu.
main.cpp
The file kirigami-tutorial/src/main.cpp handles the "business logic" of our application. C++ is handy because it is flexible and fast, even if it is more involved than other programming languages.
It also functions as the entrypoint to our application. The two parts of our project, the backend and the user interface, are both set up and started here.
| |
For now, we don't need to go into too much detail regarding what our main.cpp code does, but its role will grow significantly more important once we decide to add more complex functionality to our application in the future.
Theming on Windows
Click here to read more
The application needs to set its icon theme, QStyle, and QtQuick Controls style to Breeze in order to show up on Windows. To learn more about it, see Figuring out main.cpp.
If you want to get ahead, you can read more about how this main.cpp works in Figuring out main.cpp.
If you want to see a few ways on how the C++ code can be improved, like using KAboutData for translatable application metadata, be sure to check our KXmlGui tutorial.
For now, the part that interests us is this line:
engine.loadFromModule("org.kde.tutorial", "Main");The first argument is the URI set in kirigami-tutorial/src/CMakeLists.txt, and the second argument is the name of the QML module we want to use (Main, coming from the name of our Main.qml file, which needs to start with an uppercase letter).
The old method
You might encounter this alternative way to load QML files in real code!
The old method of loading QML files had some disadvantages and after Qt6 it became excessively verbose:
engine.load(QUrl(QStringLiteral("qrc:/qt/qml/org/kde/tutorial/qml/Main.qml")));This Qt resource URI above follows the pattern <resource_prefix><import_URI><optional_QML_dir><file>. In this case:
- resource prefix = default / in Qt5, /qt/qml in Qt6
- import URI = /org/kde/tutorial, which matches the URI org.kde.tutorial
- optional QML dir = /qml, necessary if the QML files are stored in a directory called qml/
- file = the QML file
Compiling and installing the application
We are almost at the finish line. The last thing we need to do is build and run our application. Doing so will depend on which platform you are on.
Linux or FreeBSD
If you want kdesrc-build to handle building and installation of your project, you need to specify a custom module in your ~/.config/kdesrc-buildrc:
...
module kirigami-tutorial
    no-src
end module
Then you can build and install it with the command:
kdesrc-build kirigami-tutorialIn case you want to handle building and installation manually without kdesrc-build, you will need to specify the place where the program will be installed. To do that, we need to change directories to our kirigami-tutorial/ folder in our terminal application of choice and run the following commands:
cmake -B build/
cmake --build build/
cmake --install build/ --prefix "~/.local"
The program will be installed to ~/.local/bin and its desktop entry to ~/.local/share/applications.
Windows
If you are compiling your project on Windows after having set up Craft, CMake should automatically detect the right compiler:
cmake -B build/
cmake --build build/
cmake --install build/
Depending on how you installed the compiler, you might need to specify a CMake Generator for the first step, depending on whether you are using Visual Studio (msvc) or MinGW (make) to compile your projects.
If Visual Studio, depending on the compiler you chose to install, it might be:
cmake -B build/ -G "Visual Studio 16 2019"Or:
cmake -B build/ -G "Visual Studio 17 2022"If MinGW:
cmake -B build/ -G "MinGW Makefiles"
cmake --build build/
cmake --install build/
In both cases, the program will be installed to C:\CraftRoot\bin.
If you ever get in doubt as to the name of the compiler that should be used in the cmake call, run:
cmake -GIt will list all available generators.
Uruchamianie aplikacji
You can then run the kirigami-hello program with:
kirigami-hello # On Linux, manually
kde-builder --run kirigami-hello # On Linux, with kde-builder
kdesrc-build --run --exec kirigami-hello kirigami-tutorial # On Linux, with kdesrc-build
kirigami-hello.exe # On Windows
Voilà! Now you will see your very first Kirigami app appear before your very own eyes.
To run the new QML application in mobile mode, you can use QT_QUICK_CONTROLS_MOBILE=1:
QT_QUICK_CONTROLS_MOBILE=1 kirigami-helloIf you have compiled the project manually with CMake and for some reason you'd like to uninstall the project, you can run:
cmake --build build/ --target uninstallUwaga
Next time you want to create the files and folders needed, you can use KAppTemplate or KDevelop to automatically generate a suitable project to start from. They are available from each major distribution's repositories. These applications will also generate files containing AppStream metadata and a .desktop file that contains information about how the application should be displayed in a linux application launcher.
Thanks to the magic of CMakeLists, you can also use IDEs such as KDevelop or QtCreator to develop this application within a comfortable environment with minimal effort.