Connecter des modèles C++ à votre interface utilisateur en QML
Données à partir du moteur C++ vers l'interface QML
As shown in the previous tutorial, you can connect C++ code to QML by creating a class that will be treated as just another component in QML. However, you may want to represent more complicated data, such as data that needs to act as a custom ListModel or in some way needs to be delegated from a Repeater.
We can create our own models from the C++ side, and declare how the data from that model should be represented on the QML frontend.
It is strongly recommended that you read the List views tutorial before this one.
globalDrawer:Kirigami.GlobalDrawer{isMenu:trueactions:[Kirigami.Action{text:i18n("Exposing to QML")icon.name:"kde"onTriggered:pageStack.push(Qt.createComponent("org.kde.tutorial.components","ExposePage"))},Kirigami.Action{text:i18n("C++ models in QML")icon.name:"kde"onTriggered:pageStack.push(Qt.createComponent("org.kde.tutorial.components","ModelsPage"))},Kirigami.Action{text:i18n("Quit")icon.name:"application-exit-symbolic"shortcut:StandardKey.QuitonTriggered:Qt.quit()}]}
Then, create a new src/components/ModelsPage.qml with the following contents:
1
2
3
4
5
6
7
8
9
importQtQuickimportQtQuick.LayoutsimportQtQuick.ControlsasControlsimportorg.kde.kirigamiasKirigamiKirigami.ScrollablePage{title:"C++ models in QML"// ...
}
And finally add it to src/components/CMakeLists.txt:
This will serve as the canvas for this tutorial page.
Using raw strings
To make this tutorial easier to understand how the model is populated, we will be disabling a feature that KDE applications using extra-cmake-modules (ECM) use by default that optimizes string code. This allows us to bypass having to write QStringLiteral() every time a string is introduced in our C++ code, which will be useful for the code in the upcoming header file.
In the root CMakeLists.txt file, add the following:
Disabling this CMake flag is done for didactic purposes only. Production code should use QStringLiteral() or the Qt string literals namespace instead where possible.
Préparation d'une classe
We will create a class that contains a QMap, where a QString is used as a key and QStringList objects are used as values. The frontend will be able to read and display the keys and values and be simple to use just like a one-dimensional array. It should look similar to a QML ListModel.
To do this, we need to create a class that inherits from QAbstractListModel. Let's also add some data to the QMap. These declarations will be located in model.h.
Create two new files, src/components/model.h and src/components/model.cpp.
Add those two new files to src/components/CMakeLists.txt:
Add the following as the initial contents to src/components/model.h:
 1
 2
 3
 4
 5
 6
 7
 8
 9
10
11
12
13
14
15
16
17
#pragma once
#include<QAbstractListModel>#include<qqmlintegration.h>classModel:publicQAbstractListModel{Q_OBJECTQML_ELEMENTpublic:private:QMap<QString,QStringList>m_list={{"Feline",{"Tigress","Waai Fuu"}},{"Fox",{"Carmelita","Diane","Krystal"}},{"Goat",{"Sybil","Toriel"}}};};
Of course, we can't just display this class as is. We also need to tell QML how to represent this data in the class. We can do this by overriding three essential virtual functions:
rowCount() - Think of this function as a way to tell QML how many items the model should present.
roleNames() - You can think of role names as property names attached to data in QML. This function allows you to create those roles.
data() - This function is called when you want to retrieve the data that corresponds to the role names from the model.
Note
The custom role names created by roleNames() are only usable when a model is being delegated, and are not usable outside of it. See Models and Views.
Note
Technically, models in Qt are represented as tables, with rows and columns. So, what overriding rowCount() does is tell Qt how many rows are in a model. Since we are just dealing with a one-dimensional array in this tutorial, you can just think of "rows" as "number of elements."
Remplacement et mise en œuvre de rowCount()
Let's override the function in the src/components/model.h header file. The rowCount() function comes with its own parameter, but it will not be used in this example and so doesn't need to be named.
 1
 2
 3
 4
 5
 6
 7
 8
 9
10
11
12
13
14
15
16
17
18
#pragma once
#include<QAbstractListModel>#include<qqmlintegration.h>classModel:publicQAbstractListModel{Q_OBJECTQML_ELEMENTpublic:introwCount(constQModelIndex&)constoverride;private:QMap<QString,QStringList>m_list={{"Feline",{"Tigress","Waai Fuu"}},{"Fox",{"Carmelita","Diane","Krystal"}},{"Goat",{"Sybil","Toriel"}}};};
Then, let's declare how many rows are in this model in src/components/model.cpp:
Before we override roleNames(), we need to declare what the roles are in the C++ side using a public enum. The reason for this is because these enum values are passed into data() every time QML accesses a corresponding role, and as such we can make data() return what we want.
Let's begin with creating the enum for roles in src/components/model.h, where each value is a role for the C++ side.
#pragma once
#include<QAbstractListModel>#include<qqmlintegration.h>classModel:publicQAbstractListModel{Q_OBJECTQML_ELEMENTpublic:enumRoles{SpeciesRole=Qt::UserRole,CharactersRole};QHash<int,QByteArray>roleNames()constoverride;introwCount(constQModelIndex&)constoverride;private:QMap<QString,QStringList>m_list={{"Feline",{"Tigress","Waai Fuu"}},{"Fox",{"Carmelita","Diane","Krystal"}},{"Goat",{"Sybil","Toriel"}}};};
Once we have that settled, we can finally create what these roles are in the QML side using a QHash where the keys are the enumerated values paired with QByteArrays. This should go to src/components/model.cpp. The text in the QByteArray is what's used in the actual QML code.
In our example model, the role "species" can be used to retrieve the QString key "Feline", "Fox", "Goat", each in a separate delegate. The same can be done with the QStringList values for the character names list.
Remplacement et mise en œuvre de « data() »
There are two parameters that are passed to data(): index and role. The index is the position of the data in the model. As previously stated, role is used by QML to get specific data returned when it's accessing a role.
In data(), we can use a switch statement to return the appropriate data and data type depending on the role, which is possible as data() returns a QVariant. We still need to make sure we get the appropriate location of the data, though. In this example below, you can see that a new iterator variable is being declared, which is set from the beginning of the list plus the row of the index, and the data that the iterator is pointing to is what is being returned.
We can't just return whatever data we want though. We may be trying to bind data to a property with an incompatible data type, such as a QStringList to a QString. You may have to do data conversion in order for the data to be displayed properly. For this, we create a new private, static function named formatList().
This results in the following code in src/components/model.cpp:
#pragma once
#include<QAbstractListModel>#include<qqmlintegration.h>classModel:publicQAbstractListModel{Q_OBJECTQML_ELEMENTpublic:enumRoles{SpeciesRole=Qt::UserRole,CharactersRole};introwCount(constQModelIndex&)constoverride;QHash<int,QByteArray>roleNames()constoverride;QVariantdata(constQModelIndex&index,introle)constoverride;private:QMap<QString,QStringList>m_list={{"Feline",{"Tigress","Waai Fuu"}},{"Fox",{"Carmelita","Diane","Krystal"}},{"Goat",{"Sybil","Toriel"}}};staticQStringformatList(constQStringList&list);};
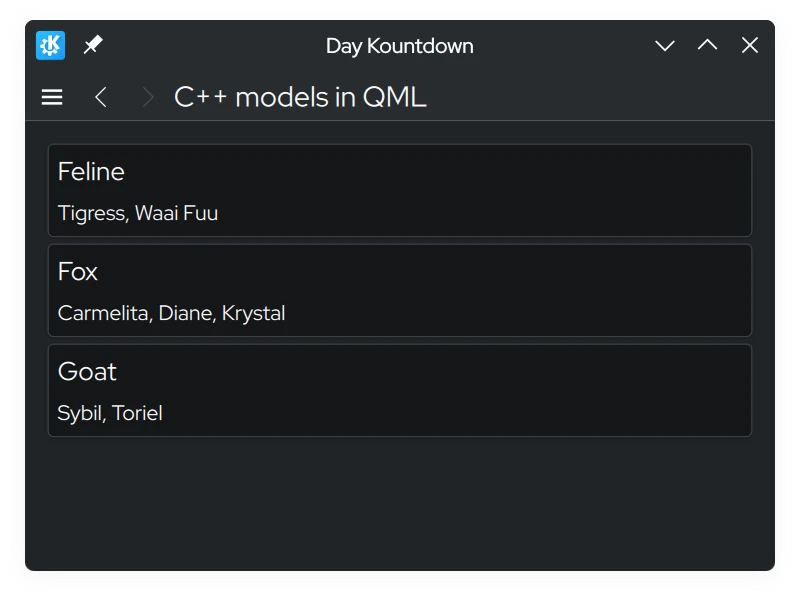
Utilisation des classes en QML
The QML file that is used will just contain three Kirigami.AbstractCard components, where the key is the header and the value is the content. These cards are created by delegating an AbstractCard using a Repeater, where the custom model we created acts as the model. The data is accessed using word model, followed by the roles we declared in roleNames().
importQtQuickimportQtQuick.LayoutsimportQtQuick.ControlsasControlsimportorg.kde.kirigamiasKirigamiKirigami.ScrollablePage{title:"C++ models in QML"Model{id: customModel}ColumnLayout{anchors.left:parent.leftanchors.right:parent.rightRepeater{model:customModeldelegate:Kirigami.AbstractCard{header:Kirigami.Heading{text:model.specieslevel:2}contentItem:Controls.Label{text:model.characters}}}}}
Modification de données
Modification des données à l'aide de dataChanged() et de setData()
You may encounter a situation where you want to modify data in the model, and have the changes reflected on the frontend side. Every time we change data in the model, we must emit the dataChanged() signal which will apply those changes on the frontend side at the specific cells specified in its arguments. In this tutorial, we can just use the index argument of setData().
setData() is a virtual function you can override so that modifying the data from the frontend side automatically reflects those changes on the backend side. It requires three parameters:
« index » - L'emplacement des données.
value - Le contenu des nouvelles données.
role - In this context, the role here is used to tell views how they should handle data. The role here should be Qt::EditRole.
The role parameter in this case is used to ensure setData() can be edited via user input (Qt::EditRole). Using index, we can use that to determine the location of where the data should be edited with the contents of value.
#pragma once
#include<QAbstractListModel>#include<qqmlintegration.h>classModel:publicQAbstractListModel{Q_OBJECTQML_ELEMENTpublic:enumRoles{SpeciesRole=Qt::UserRole,CharactersRole};introwCount(constQModelIndex&)constoverride;QHash<int,QByteArray>roleNames()constoverride;QVariantdata(constQModelIndex&index,introle)constoverride;boolsetData(constQModelIndex&index,constQVariant&value,introle)override;private:QMap<QString,QStringList>m_list={{"Feline",{"Tigress","Waai Fuu"}},{"Fox",{"Carmelita","Diane","Krystal"}},{"Goat",{"Sybil","Toriel"}}};staticQStringformatList(constQStringList&list);};
Let's update the QML code so that we can open up a prompt that allows us to edit the model using a Controls.Button attached to the cards.
Add the following Kirigami.PromptDialog to the src/components/ModelsPage.qml, together with a new edit button:
importQtQuickimportQtQuick.LayoutsimportQtQuick.ControlsasControlsimportorg.kde.kirigamiasKirigamiimportorg.kde.tutorial.componentsKirigami.ScrollablePage{title:"C++ models in QML"Model{id: customModel}ColumnLayout{anchors.left:parent.leftanchors.right:parent.rightRepeater{model:customModeldelegate:Kirigami.AbstractCard{Layout.fillHeight:trueheader:Kirigami.Heading{text:model.specieslevel:2}contentItem:Item{implicitWidth:delegateLayout.implicitWidthimplicitHeight:delegateLayout.implicitHeightColumnLayout{id: delegateLayoutControls.Label{text:model.characters}Controls.Button{text:"Edit"onClicked:{editPrompt.text=model.characters;editPrompt.model=model;editPrompt.open();}}}}}}}Kirigami.PromptDialog{id: editPromptpropertyvarmodelpropertyaliastext:editPromptText.texttitle:"Edit Characters"standardButtons:Kirigami.Dialog.Ok|Kirigami.Dialog.CancelonAccepted:{constmodel=editPrompt.model;model.characters=editPromptText.text;editPrompt.close();}Controls.TextField{id: editPromptTextonAccepted:editPrompt.accept()}}}
Now, whenever the values of the model change in the frontend, the changes should automatically update on the backend.
Ajout de lignes
We added a way to modify the data in existing keys of the QMap, and in the front end, this is reflected as modifying the contents inside the AbstractCards. But what if we need to add a new key entry in the QMap and have that reflected on the QML side? Let's do this by creating a new method that is callable on the QML side to perform this task.
To make the method visible in QML, we must begin the method declaration with the Q_INVOKABLE macro. This method will also include a string parameter, which is intended to be the new key in the QMap.
#pragma once
#include<QAbstractListModel>#include<qqmlintegration.h>classModel:publicQAbstractListModel{Q_OBJECTQML_ELEMENTpublic:enumRoles{SpeciesRole=Qt::UserRole,CharactersRole};introwCount(constQModelIndex&)constoverride;QHash<int,QByteArray>roleNames()constoverride;QVariantdata(constQModelIndex&index,introle)constoverride;Q_INVOKABLEvoidaddSpecies(constQString&species);private:QMap<QString,QStringList>m_list={{"Feline",{"Tigress","Waai Fuu"}},{"Fox",{"Carmelita","Diane","Krystal"}},{"Goat",{"Sybil","Toriel"}}};staticQStringformatList(constQStringList&list);};
Inside of this method, we need to tell Qt that we want to create more rows in the model. This is done by calling beginInsertRows() to begin our row adding operation, followed by inserting whatever we need, then use endInsertRows() to end the operation. We still need to emit dataChanged() at the end, however. This time, we are going to update all rows, from the first row to the last one as the QMap may alphabetically reorganize itself, and we need to catch that across all rows.
When calling beginInsertRows(), we need to first pass in a QModelIndex class to specify the location of where the new rows should be added, followed by what the new first and last row numbers are going to be. In this tutorial, the first argument will just be QModelIndex() as there is no need to use the parameter here. We can just use the current row size for the first and last row number, as we'll just be adding one row at the end of the model.
The dataChanged() function uses QModelIndex as the data type for its parameters. However, we can convert integers in QModelIndex data types using the index() function.
Mettons à jour le code QML afin d'avoir la possibilité d'ajouter une nouvelle clé à la carte « QMap ».
importQtQuickimportQtQuick.LayoutsimportQtQuick.ControlsasControlsimportorg.kde.kirigamiasKirigamiimportorg.kde.tutorial.componentsKirigami.ScrollablePage{title:"C++ models in QML"actions:[Kirigami.Action{icon.name:"list-add-symbolic"text:"Add New Species"onTriggered:{addPrompt.open();}}]Model{id: customModel}ColumnLayout{// ...
}Kirigami.PromptDialog{id: addPrompttitle:"Add New Species"standardButtons:Kirigami.Dialog.OkonAccepted:{customModel.addSpecies(addPromptText.text);addPromptText.text="";// Clear TextField every time it's done
addPrompt.close();}Controls.TextField{id: addPromptTextLayout.fillWidth:trueonAccepted:addPrompt.accept()}}Kirigami.PromptDialog{id: editPrompt// ...
}}
Now, we should be given a new action at the top of the app that brings up a prompt that allows to add a new element to the model, with our own custom data.
Suppression de lignes
The way remove rows is similar to adding rows. Let's create another method that we'll call in QML. This time, we will use an additional parameter, and that is an integer that is the row number. The species name is used to delete the key from the QMap, while the row number will be used to delete the row on the front end.
Add a new Q_INVOKABLE function named deleteSpecies() in src/components/model.h:
#pragma once
#include<QAbstractListModel>#include<qqmlintegration.h>classModel:publicQAbstractListModel{Q_OBJECTQML_ELEMENTpublic:enumRoles{SpeciesRole=Qt::UserRole,CharactersRole};introwCount(constQModelIndex&)constoverride;QHash<int,QByteArray>roleNames()constoverride;QVariantdata(constQModelIndex&index,introle)constoverride;Q_INVOKABLEvoidaddSpecies(constQString&species);Q_INVOKABLEvoiddeleteSpecies(constQString&speciesName,constint&rowIndex);private:QMap<QString,QStringList>m_list={{"Feline",{"Tigress","Waai Fuu"}},{"Fox",{"Carmelita","Diane","Krystal"}},{"Goat",{"Sybil","Toriel"}}};staticQStringformatList(constQStringList&list);};
With a matching implementation in src/components/model.cpp:
Now, let's update the application so a "Delete" button appears in a RowLayout alongside the edit button inside our AbstractCard, and hook it up to our delete method.
importorg.kde.kirigamiasKirigamiimportorg.kde.tutorial.componentsKirigami.Page{title:"Exposing to QML Tutorial"Kirigami.Heading{anchors.centerIn:parenttext:Backend.introductionText}}
src/components/backend.h
1
2
3
4
5
6
7
8
9
10
11
12
13
14
15
16
17
18
19
#pragma once
#include<QObject>#include<qqmlintegration.h>classBackend:publicQObject{Q_OBJECTQML_ELEMENTQML_SINGLETONQ_PROPERTY(QStringintroductionTextREADintroductionTextWRITEsetIntroductionTextNOTIFYintroductionTextChanged)public:explicitBackend(QObject*parent=nullptr);QStringintroductionText()const;voidsetIntroductionText(constQString&introductionText);Q_SIGNALvoidintroductionTextChanged();private:QStringm_introductionText=QStringLiteral("Hello World!");};
importQtQuickimportQtQuick.LayoutsimportQtQuick.ControlsasControlsimportorg.kde.kirigamiasKirigamiimportorg.kde.tutorial.componentsKirigami.ScrollablePage{title:"C++ models in QML"actions:[Kirigami.Action{icon.name:"list-add-symbolic"text:"Add New Species"onTriggered:{addPrompt.open();}}]Model{id: customModel}ColumnLayout{anchors.left:parent.leftanchors.right:parent.rightRepeater{model:customModeldelegate:Kirigami.AbstractCard{Layout.fillHeight:trueheader:Kirigami.Heading{text:model.specieslevel:2}contentItem:Item{implicitWidth:delegateLayout.implicitWidthimplicitHeight:delegateLayout.implicitHeightColumnLayout{id: delegateLayoutControls.Label{text:model.characters}RowLayout{Layout.fillWidth:trueControls.Button{text:"Edit"onClicked:{editPrompt.text=model.characters;editPrompt.model=model;editPrompt.open();}}Controls.Button{text:"Delete"onClicked:{customModel.deleteSpecies(model.species,index);}}}}}}}}Kirigami.PromptDialog{id: addPrompttitle:"Add New Species"standardButtons:Kirigami.Dialog.OkonAccepted:{customModel.addSpecies(addPromptText.text);addPromptText.text="";// Clear TextField every time it's done
addPrompt.close();}Controls.TextField{id: addPromptTextLayout.fillWidth:trueonAccepted:addPrompt.accept()}}Kirigami.PromptDialog{id: editPromptpropertyvarmodelpropertyaliastext:editPromptText.texttitle:"Edit Characters"standardButtons:Kirigami.Dialog.Ok|Kirigami.Dialog.CancelonAccepted:{constmodel=editPrompt.model;model.characters=editPromptText.text;editPrompt.close();}Controls.TextField{id: editPromptTextonAccepted:editPrompt.accept()}}}
#pragma once
#include<QAbstractListModel>#include<qqmlintegration.h>classModel:publicQAbstractListModel{Q_OBJECTQML_ELEMENTpublic:enumRoles{SpeciesRole=Qt::UserRole,CharactersRole};introwCount(constQModelIndex&)constoverride;QHash<int,QByteArray>roleNames()constoverride;QVariantdata(constQModelIndex&index,introle)constoverride;boolsetData(constQModelIndex&index,constQVariant&value,introle)override;Q_INVOKABLEvoidaddSpecies(constQString&species);Q_INVOKABLEvoiddeleteSpecies(constQString&speciesName,constint&rowIndex);private:QMap<QString,QStringList>m_list={{"Feline",{"Tigress","Waai Fuu"}},{"Fox",{"Carmelita","Diane","Krystal"}},{"Goat",{"Sybil","Toriel"}}};staticQStringformatList(constQStringList&list);};