Introduction aux modules externes de Kirigami
Kirigami Addons is an additional set of visual components that work well on mobile and desktop and are guaranteed to be cross-platform. It uses Kirigami under the hood to create its components.
Ici, vous mettrez en place votre nouveau projet de modules externes de Kirigami et il vous sera présenté quelques composants utiles.
These components make use of KDE's localization facilities, so before we start using these, we will need to set a little project that makes use of KLocalizedContext.
Configuration de votre projet
La structure initiale du projet devrait ressembler à ceci :
addonsexample/
├── CMakeLists.txt
├── main.cpp
└── Main.qml
Infobulle
Vous pouvez rapidement créer cette structure de fichiers avec :
mkdir -p addonsexample/contents/ui
touch addonsexample/{CMakeLists.txt,main.cpp}
touch addonsexample/Main.qml
Nous commençons par utiliser un fichier cMakelists.txt très classique :
cmake_minimum_required(VERSION 3.20)

project(FormCardTutorial)

find_package(ECM REQUIRED NO_MODULE)
set(CMAKE_MODULE_PATH ${ECM_MODULE_PATH})

include(KDEInstallDirs)
include(KDECompilerSettings)
include(KDECMakeSettings)
include(ECMQmlModule)

find_package(Qt6 REQUIRED COMPONENTS
    Widgets        # For QApplication
    Quick          # For QML
    QuickControls2 # For QQuickStyle
)
find_package(KF6 REQUIRED COMPONENTS
    CoreAddons # For KAboutData
    I18n       # For KLocalizedContext
)
qt_policy(SET QTP0001 NEW)

add_executable(addonsexample)

target_sources(addonsexample PRIVATE main.cpp)

ecm_add_qml_module(addonsexample
    GENERATE_PLUGIN_SOURCE
    URI org.kde.addonsexample
)

ecm_target_qml_sources(addonsexample SOURCES
    Main.qml
    SettingsPage.qml
    JsonAboutPage.qml
)

target_link_libraries(addonsexample PRIVATE
    Qt::Widgets
    Qt::Quick
    Qt::QuickControls2
    KF6::CoreAddons
    KF6::I18n
)

install(TARGETS addonsexample DESTINATION ${KDE_INSTALL_BINDIR})
La partie intéressante sera le fichier « main.cpp » :
#include <QtQml>
#include <QApplication>
#include <QQmlApplicationEngine>
#include <QIcon>
#include <QQuickStyle>
#include <KAboutData>
#include <KLocalizedContext>
#include <KLocalizedString>

int main(int argCount, char* argVector[])
{
    QApplication app(argCount, argVector);
    KLocalizedString::setApplicationDomain("org.kde.addonsexample");

    KAboutData aboutData(
        QStringLiteral("addonsexample"),
        i18nc("@title:window", "Addons Example"),
        QStringLiteral("1.0"),
        i18nc("@info", "This program shows how to use Kirigami Addons"),
        KAboutLicense::GPL_V3,
        QStringLiteral("(C) 2023"),
        i18nc("@info", "Optional text shown in the About"),
        QStringLiteral("https://kde.org"));

    aboutData.addAuthor(i18nc("@info:credit", "John Doe"),
                        i18nc("@info:credit", "Maintainer"));

    KAboutData::setApplicationData(aboutData);

    if (qEnvironmentVariableIsEmpty("QT_QUICK_CONTROLS_STYLE")) {
        QQuickStyle::setStyle(QStringLiteral("org.kde.desktop"));
    }
    QApplication::setWindowIcon(QIcon::fromTheme(QStringLiteral("kde")));

    QQmlApplicationEngine engine;
    engine.rootContext()->setContextObject(new KLocalizedContext(&engine));
    engine.loadFromModule("org.kde.addonsexample", "Main");
    app.exec();
}
If you have read our KXmlGui tutorial or the last Kirigami tutorial on the Kirigami About page, much of this will seem familiar to you.
We create our application and use KAboutData's default constructor to add the metadata of our application, add ourselves as an author, and then use setApplicationData() to finish the process. For later, we also set an application icon that comes from the system theme.
We then use a lambda in qmlRegisterSingletonType() to directly send the metadata of our application to the QML side, exposing its properties.
We then instantiate our QML engine, and set its context to use KDE's KLocalizedContext, used to integrate translated strings, passing the just created engine as a parameter.
Nous chargeons simplement notre fichier QML à partir du fichier de ressources. Et maintenant, nous devons simplement prendre soin de notre fichier QML initial.
FormCard et FormbuttonDelegate
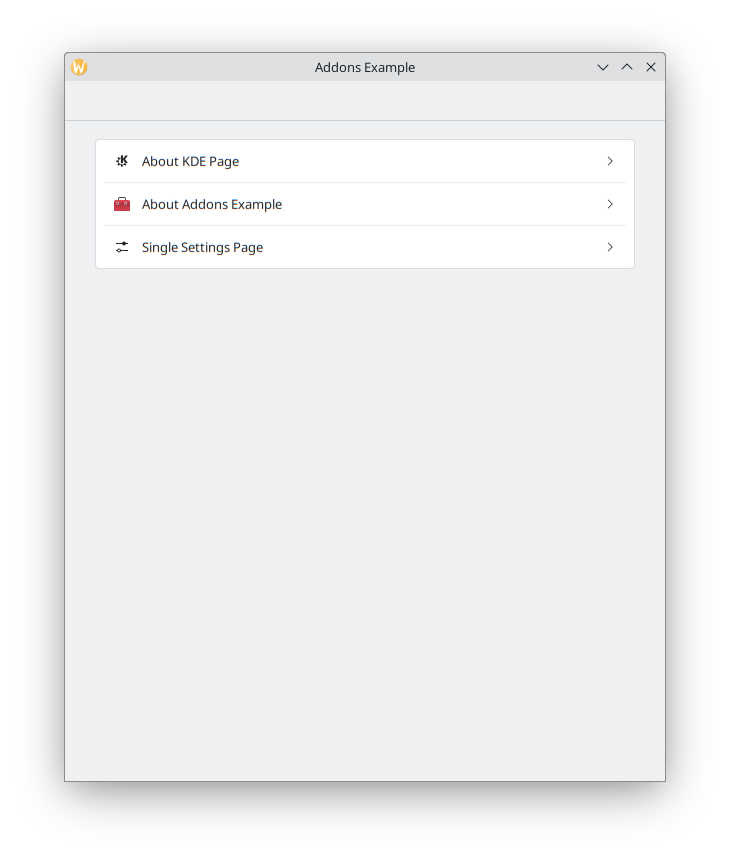
The idea for our app is to design our own Kirigami Addons gallery, showcasing multiple components, one per page. The main page will contain a simple list of buttons in a ColumnLayout, each opening a separate page.
Au début, notre fichier Main.qml devrait ressembler à ceci :
| |
We use our handy pageStack to set the initial page to a Kirigami.ScrollablePage.
While we could use a FormLayout together with QtQuick Controls components to achieve our goal, here you will be introduced to FormCard.
The main purpose of a FormCard is to serve as a container for other components while following a color different from the background, in a similar manner to a Kirigami.Card, but for settings windows. You can have multiple FormCards in your application to indicate different sections. Your FormCard is also expected to be a direct child of a ColumnLayout.
L'importation de org.kde.kirigamiaddons.formcard met tous les composants FormCard à la disposition de votre fichier QML.
Nous n'aurons qu'une seule section dans notre page principale. Ainsi, nous n'ajoutons qu'une seule carte de formulaire :
| |
The great thing about FormCard is that it does automatic layouting for you. In other words, just the order of its components is enough to indicate their position inside the FormCard, no Layout attached properties are necessary and you are expected not to use anchors or positioners.
Nous pouvons simplement ajouter quelques boutons à l'intérieur de notre carte FormCard :
| |
C'est ça ! Les boutons ne sont pas encore utilisables, mais nous avons maintenant tout mis en place pour jouer avec nos pages « À propos » !
Nous le compilons ensuite et l'exécutons comme cela :
cmake -B build/ -DCMAKE_INSTALL_PREFIX=~/kde5/usr
cmake --build build/
cmake --install build/
aboutexample
To see other ways to build your application (for example, on Windows), see the Getting Started with Kirigami page.