Conectar modelos de C++ a la interfaz de usuario QML
Datos del motor C++ a la interfaz de QML
As shown in the previous tutorial, you can connect C++ code to QML by creating a class that will be treated as just another component in QML. However, you may want to represent more complicated data, such as data that needs to act as a custom ListModel or in some way needs to be delegated from a Repeater.
Podemos crear nuestros propios modelos desde el lado C++ y declarar cómo se deben representar los datos de este modelo en la interfaz QML.
It is strongly recommended that you read the List views tutorial before this one.
globalDrawer:Kirigami.GlobalDrawer{isMenu:trueactions:[Kirigami.Action{text:i18n("Exposing to QML")icon.name:"kde"onTriggered:pageStack.push(Qt.createComponent("org.kde.tutorial.components","ExposePage"))},Kirigami.Action{text:i18n("C++ models in QML")icon.name:"kde"onTriggered:pageStack.push(Qt.createComponent("org.kde.tutorial.components","ModelsPage"))},Kirigami.Action{text:i18n("Quit")icon.name:"application-exit-symbolic"shortcut:StandardKey.QuitonTriggered:Qt.quit()}]}
Then, create a new src/components/ModelsPage.qml with the following contents:
1
2
3
4
5
6
7
8
9
importQtQuickimportQtQuick.LayoutsimportQtQuick.ControlsasControlsimportorg.kde.kirigamiasKirigamiKirigami.ScrollablePage{title:"C++ models in QML"// ...
}
And finally add it to src/components/CMakeLists.txt:
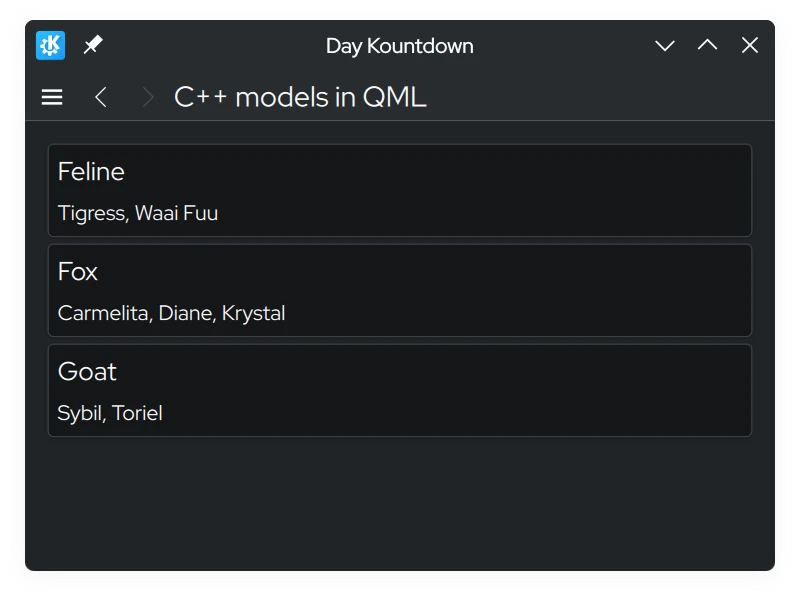
This will serve as the canvas for this tutorial page.
Using raw strings
To make this tutorial easier to understand how the model is populated, we will be disabling a feature that KDE applications using extra-cmake-modules (ECM) use by default that optimizes string code. This allows us to bypass having to write QStringLiteral() every time a string is introduced in our C++ code, which will be useful for the code in the upcoming header file.
In the root CMakeLists.txt file, add the following:
Disabling this CMake flag is done for didactic purposes only. Production code should use QStringLiteral() or the Qt string literals namespace instead where possible.
Preparación de la clase
We will create a class that contains a QMap, where a QString is used as a key and QStringList objects are used as values. The frontend will be able to read and display the keys and values and be simple to use just like a one-dimensional array. It should look similar to a QML ListModel.
Para ello, necesitamos crear una clase que herede de QAbstractListModel. También añadiremos datos al QMap. Estas declaraciones estarán en model.h.
Creamos dos nuevos archivos, src/components/model.h y src/components/model.cpp.
Añadimos estos dos nuevos archivos a src/components/CMakeLists.txt:
Añadimos el siguiente contenido inicial a src/components/model.h:
 1
 2
 3
 4
 5
 6
 7
 8
 9
10
11
12
13
14
15
16
17
#pragma once
#include<QAbstractListModel>#include<qqmlintegration.h>classModel:publicQAbstractListModel{Q_OBJECTQML_ELEMENTpublic:private:QMap<QString,QStringList>m_list={{"Feline",{"Tigress","Waai Fuu"}},{"Fox",{"Carmelita","Diane","Krystal"}},{"Goat",{"Sybil","Toriel"}}};};
Por supuesto, no podemos mostrar esta clase como está. También necesitamos decirle a QML cómo se representan estos datos en la clase. Podemos hacerlo sobrescribiendo tres funciones virtuales esenciales:
rowCount(): Piense en esta función como un modo de decirle a QML cuántos elementos debe presentar el modelo.
roleNames(): Se puede decir que los nombres de los roles son nombres de propiedades adjuntados a los datos en QML. Esta función le permite crear dichos roles.
data(): Esta función se llama cuando necesite obtener los datos que corresponden a los nombres de roles del modelo.
Nota
Los nombres de roles personalizados creados por roleNames() solo se pueden usar cuando un modelo está delegado, y no se pueden usar fuera del mismo. Consulte Modelos y vistas.
Nota
Técnicamente, los modelos de Qt se representan como tablas, con filas y columnas. Así, lo que la sobrescritura de rowCount() hace es decirle a Qt cuántas filas hay en un modelo. Como solo estamos tratando con una matriz de una única dimensión en este tutorial, podemos pensar en las «filas» como «número de elementos».
Sobrescritura e implementación de rowCount()
Let's override the function in the src/components/model.h header file. The rowCount() function comes with its own parameter, but it will not be used in this example and so doesn't need to be named.
 1
 2
 3
 4
 5
 6
 7
 8
 9
10
11
12
13
14
15
16
17
18
#pragma once
#include<QAbstractListModel>#include<qqmlintegration.h>classModel:publicQAbstractListModel{Q_OBJECTQML_ELEMENTpublic:introwCount(constQModelIndex&)constoverride;private:QMap<QString,QStringList>m_list={{"Feline",{"Tigress","Waai Fuu"}},{"Fox",{"Carmelita","Diane","Krystal"}},{"Goat",{"Sybil","Toriel"}}};};
A continuación declaramos cuántas filas hay en este modelo en src/components/model.cpp:
Before we override roleNames(), we need to declare what the roles are in the C++ side using a public enum. The reason for this is because these enum values are passed into data() every time QML accesses a corresponding role, and as such we can make data() return what we want.
Let's begin with creating the enum for roles in src/components/model.h, where each value is a role for the C++ side.
#pragma once
#include<QAbstractListModel>#include<qqmlintegration.h>classModel:publicQAbstractListModel{Q_OBJECTQML_ELEMENTpublic:enumRoles{SpeciesRole=Qt::UserRole,CharactersRole};QHash<int,QByteArray>roleNames()constoverride;introwCount(constQModelIndex&)constoverride;private:QMap<QString,QStringList>m_list={{"Feline",{"Tigress","Waai Fuu"}},{"Fox",{"Carmelita","Diane","Krystal"}},{"Goat",{"Sybil","Toriel"}}};};
Una vez que tengamos esto resuelto, podremos crear lo que son dichos roles en el lado QML usando un QHash donde las claves son los valores de enumeración emparejados con QByteArrays. Esto debe ir en `src/components/model.cpp. El texto del QByteArray es lo que se usa en el código QML real.
En el modelo de nuestro ejemplo, el rol «especies» se puede usar para obtener la clave QString «Felino», «Zorro», «Cabra», cada una en un delegado separado. Se puede hacer lo mismo con los valores QStringList para la lista de nombres de caracteres.
Sobrescritura e implementación de data()
Existen dos parámetros que se pasan a data(): index y role. index es la posición de los datos en el modelo. Como se ha dicho anteriormente, QML usa role para devolver datos específicos cuando accede a un rol.
En data() podemos usar una sentencia «switch» para devolver los datos apropiados y el tipo de dato según el rol, lo que es posible porque data() devuelve una QVariant. No obstante, todavía tenemos que asegurarnos de que obtenemos la posición apropiada de los datos. En el siguiente ejemplo se puede ver que se declara una nueva variable de iteración, que se establece al principio de la lista más la fila del índice y los datos a los que apunta el iterador son los que se devuelven.
Sin embargo, no podemos simplemente devolver los datos que queramos. Es posible que estemos intentando asociar datos a una propiedad con un tipo de datos incompatible, como una QStringList a una QString. Es posible que tenga que realizar una conversión de datos para que los datos se muestren correctamente. Para ello, creamos una nueva función estática privada con el nombre formatList().
This results in the following code in src/components/model.cpp:
#pragma once
#include<QAbstractListModel>#include<qqmlintegration.h>classModel:publicQAbstractListModel{Q_OBJECTQML_ELEMENTpublic:enumRoles{SpeciesRole=Qt::UserRole,CharactersRole};introwCount(constQModelIndex&)constoverride;QHash<int,QByteArray>roleNames()constoverride;QVariantdata(constQModelIndex&index,introle)constoverride;private:QMap<QString,QStringList>m_list={{"Feline",{"Tigress","Waai Fuu"}},{"Fox",{"Carmelita","Diane","Krystal"}},{"Goat",{"Sybil","Toriel"}}};staticQStringformatList(constQStringList&list);};
Uso de clases en QML
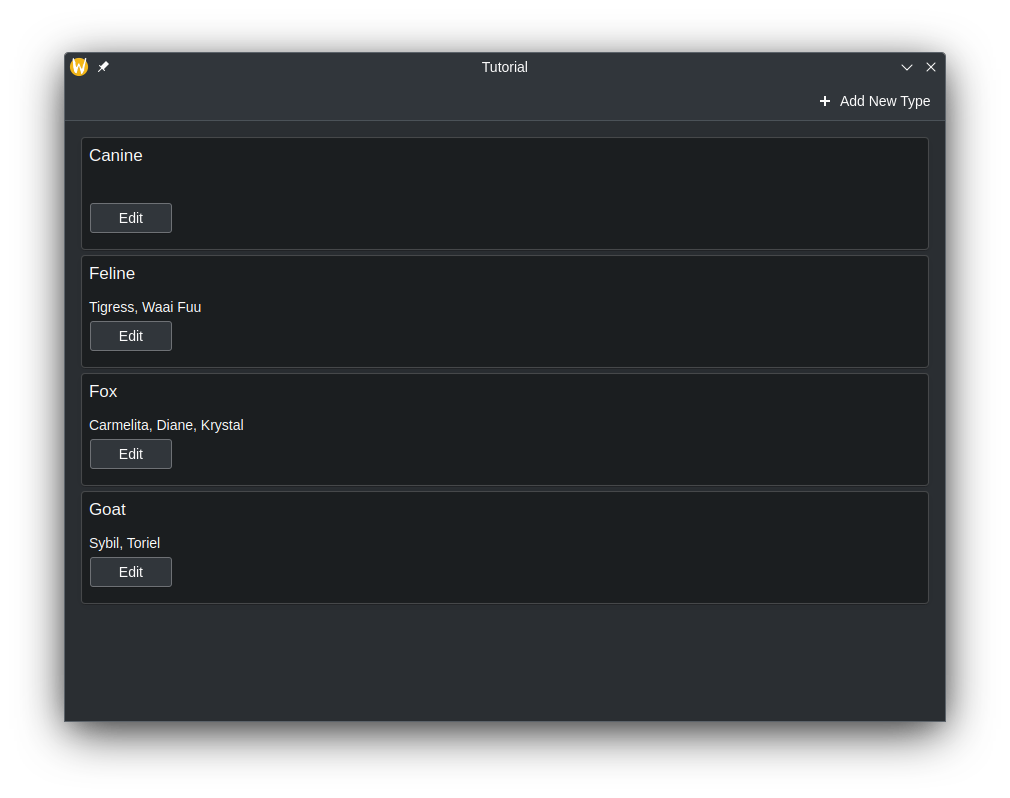
El archivo QML que se usa contendrá solo tres componentes Kirigami.AbstractCard, donde la clave es la cabecera y el valor es el contenido. Estas tarjetas se crean delegando una AbstractCard que usa un Repeater, donde el modelo personalizado que hemos creado actúa como modelo. Se accede a los datos usando la palabra model, seguida por los roles que hemos declarado en roleNames().
importQtQuickimportQtQuick.LayoutsimportQtQuick.ControlsasControlsimportorg.kde.kirigamiasKirigamiKirigami.ScrollablePage{title:"C++ models in QML"Model{id: customModel}ColumnLayout{anchors.left:parent.leftanchors.right:parent.rightRepeater{model:customModeldelegate:Kirigami.AbstractCard{header:Kirigami.Heading{text:model.specieslevel:2}contentItem:Controls.Label{text:model.characters}}}}}
Modificación de datos
Edición de datos con dataChanged() y setData()
You may encounter a situation where you want to modify data in the model, and have the changes reflected on the frontend side. Every time we change data in the model, we must emit the dataChanged() signal which will apply those changes on the frontend side at the specific cells specified in its arguments. In this tutorial, we can just use the index argument of setData().
setData() is a virtual function you can override so that modifying the data from the frontend side automatically reflects those changes on the backend side. It requires three parameters:
index: La posición de los datos.
value: El contenido de los datos nuevos.
role - In this context, the role here is used to tell views how they should handle data. The role here should be Qt::EditRole.
En este caso, el parámetro role se usa para garantizar que setData() se pueda editar mediante la entrada del usuario (Qt::EditRole). Mediante index, podemos usarlo para determinar la ubicación donde se deben editar los datos con el contenido de value.
#pragma once
#include<QAbstractListModel>#include<qqmlintegration.h>classModel:publicQAbstractListModel{Q_OBJECTQML_ELEMENTpublic:enumRoles{SpeciesRole=Qt::UserRole,CharactersRole};introwCount(constQModelIndex&)constoverride;QHash<int,QByteArray>roleNames()constoverride;QVariantdata(constQModelIndex&index,introle)constoverride;boolsetData(constQModelIndex&index,constQVariant&value,introle)override;private:QMap<QString,QStringList>m_list={{"Feline",{"Tigress","Waai Fuu"}},{"Fox",{"Carmelita","Diane","Krystal"}},{"Goat",{"Sybil","Toriel"}}};staticQStringformatList(constQStringList&list);};
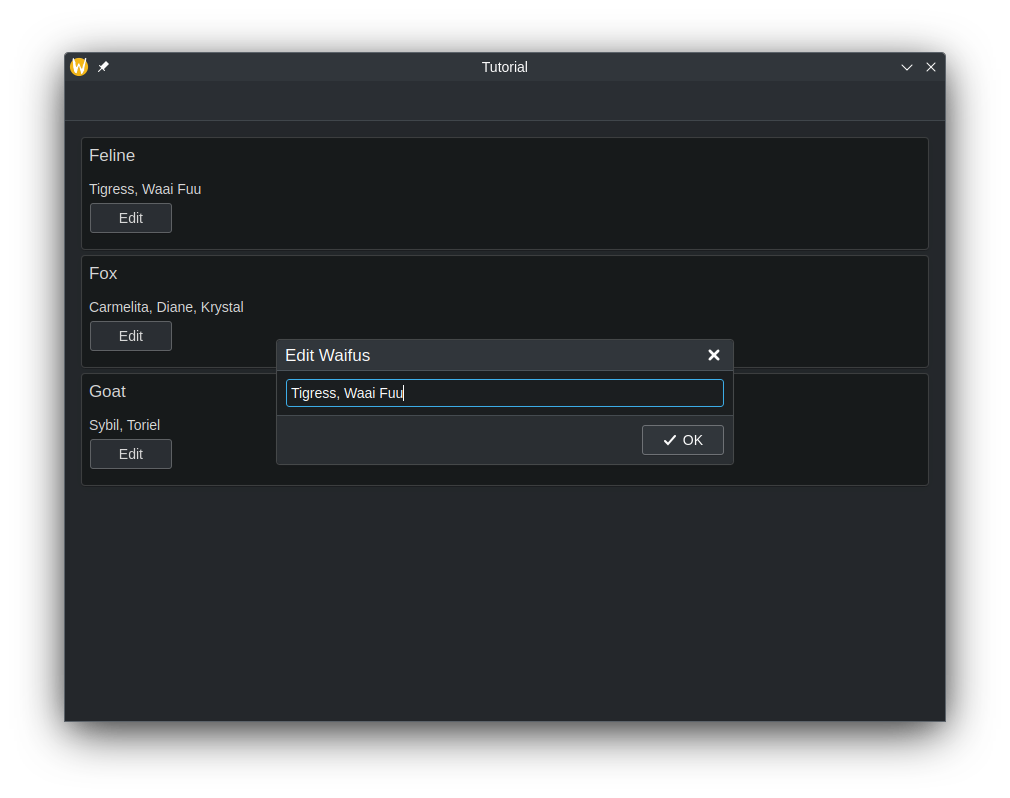
Let's update the QML code so that we can open up a prompt that allows us to edit the model using a Controls.Button attached to the cards.
Add the following Kirigami.PromptDialog to the src/components/ModelsPage.qml, together with a new edit button:
importQtQuickimportQtQuick.LayoutsimportQtQuick.ControlsasControlsimportorg.kde.kirigamiasKirigamiimportorg.kde.tutorial.componentsKirigami.ScrollablePage{title:"C++ models in QML"Model{id: customModel}ColumnLayout{anchors.left:parent.leftanchors.right:parent.rightRepeater{model:customModeldelegate:Kirigami.AbstractCard{Layout.fillHeight:trueheader:Kirigami.Heading{text:model.specieslevel:2}contentItem:Item{implicitWidth:delegateLayout.implicitWidthimplicitHeight:delegateLayout.implicitHeightColumnLayout{id: delegateLayoutControls.Label{text:model.characters}Controls.Button{text:"Edit"onClicked:{editPrompt.text=model.characters;editPrompt.model=model;editPrompt.open();}}}}}}}Kirigami.PromptDialog{id: editPromptpropertyvarmodelpropertyaliastext:editPromptText.texttitle:"Edit Characters"standardButtons:Kirigami.Dialog.Ok|Kirigami.Dialog.CancelonAccepted:{constmodel=editPrompt.model;model.characters=editPromptText.text;editPrompt.close();}Controls.TextField{id: editPromptTextonAccepted:editPrompt.accept()}}}
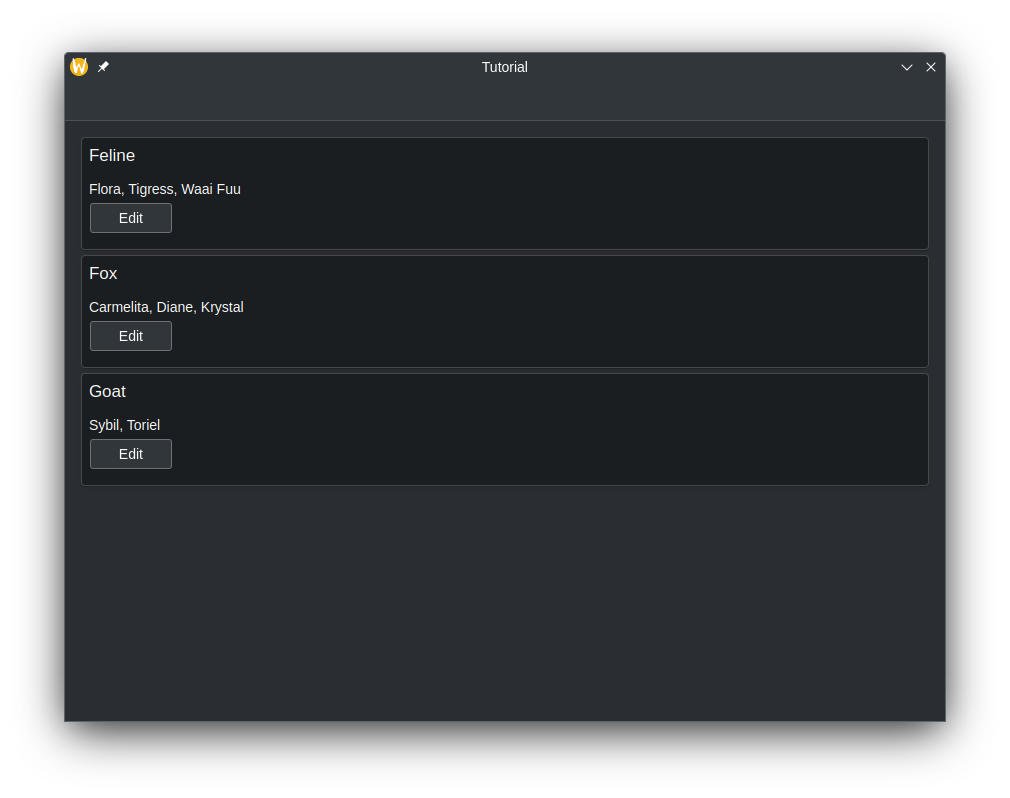
Ahora, cada vez que los valores del modelo cambian en la interfaz, los cambios deberían actualizarse automáticamente en el motor.
Añadir filas
Hemos añadido una forma de modificar los datos en las claves de QMap existentes y, en la interfaz, esto se refleja como una modificación del contenido dentro de AbstractCards. Pero, ¿qué pasa si necesitamos añadir una nueva entrada de clave en el QMap y reflejarla en el lado QML? Hagamos esto creando un nuevo método que se pueda llamar en el lado QML para realizar esta tarea.
To make the method visible in QML, we must begin the method declaration with the Q_INVOKABLE macro. This method will also include a string parameter, which is intended to be the new key in the QMap.
#pragma once
#include<QAbstractListModel>#include<qqmlintegration.h>classModel:publicQAbstractListModel{Q_OBJECTQML_ELEMENTpublic:enumRoles{SpeciesRole=Qt::UserRole,CharactersRole};introwCount(constQModelIndex&)constoverride;QHash<int,QByteArray>roleNames()constoverride;QVariantdata(constQModelIndex&index,introle)constoverride;Q_INVOKABLEvoidaddSpecies(constQString&species);private:QMap<QString,QStringList>m_list={{"Feline",{"Tigress","Waai Fuu"}},{"Fox",{"Carmelita","Diane","Krystal"}},{"Goat",{"Sybil","Toriel"}}};staticQStringformatList(constQStringList&list);};
Inside of this method, we need to tell Qt that we want to create more rows in the model. This is done by calling beginInsertRows() to begin our row adding operation, followed by inserting whatever we need, then use endInsertRows() to end the operation. We still need to emit dataChanged() at the end, however. This time, we are going to update all rows, from the first row to the last one as the QMap may alphabetically reorganize itself, and we need to catch that across all rows.
Al llamar a beginInsertRows() debemos pasar primero una clase QModelIndex para indicar la posición donde se deben añadir las nuevas filas, seguido de los números de la primera y última fila. En este tutorial, el primer argumento será QModelIndex(), puesto que no hay necesidad de usar el parámetro aquí. Podemos usar el tamaño de la fila actual para los números de la primera y de la última filas, ya que solo vamos a añadir una fila al final del modelo.
La función dataChanged() usa QModelIndex como el tipo de dato para sus parámetros. No obstante, podemos convertir enteros en QModelIndex usando la función index().
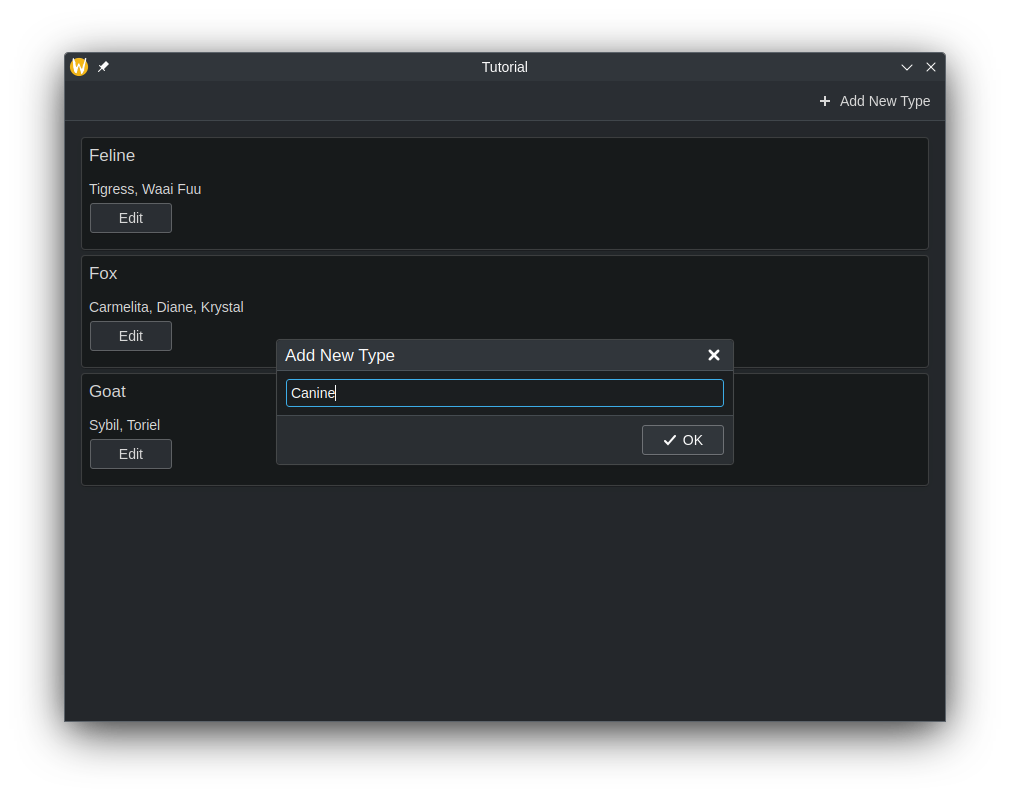
Actualicemos el código QML para tener la capacidad de añadir una nueva clave al QMap.
importQtQuickimportQtQuick.LayoutsimportQtQuick.ControlsasControlsimportorg.kde.kirigamiasKirigamiimportorg.kde.tutorial.componentsKirigami.ScrollablePage{title:"C++ models in QML"actions:[Kirigami.Action{icon.name:"list-add-symbolic"text:"Add New Species"onTriggered:{addPrompt.open();}}]Model{id: customModel}ColumnLayout{// ...
}Kirigami.PromptDialog{id: addPrompttitle:"Add New Species"standardButtons:Kirigami.Dialog.OkonAccepted:{customModel.addSpecies(addPromptText.text);addPromptText.text="";// Clear TextField every time it's done
addPrompt.close();}Controls.TextField{id: addPromptTextLayout.fillWidth:trueonAccepted:addPrompt.accept()}}Kirigami.PromptDialog{id: editPrompt// ...
}}
Ahora deberíamos tener una nueva acción en la parte superior de la aplicación que muestra un mensaje que permite añadir un nuevo elemento al modelo con nuestros propios datos personalizados.
Eliminar filas
La forma de eliminar filas es similar a la de añadirlas. Vamos a crear otro método que llamaremos en QML. Esta vez, usaremos un parámetro adicional, que es un entero que representa el número de fila. El nombre de la especie se usa para eliminar la clave del QMap, mientras que el número de fila se usa para eliminar la fila en la interfaz.
Add a new Q_INVOKABLE function named deleteSpecies() in src/components/model.h:
#pragma once
#include<QAbstractListModel>#include<qqmlintegration.h>classModel:publicQAbstractListModel{Q_OBJECTQML_ELEMENTpublic:enumRoles{SpeciesRole=Qt::UserRole,CharactersRole};introwCount(constQModelIndex&)constoverride;QHash<int,QByteArray>roleNames()constoverride;QVariantdata(constQModelIndex&index,introle)constoverride;Q_INVOKABLEvoidaddSpecies(constQString&species);Q_INVOKABLEvoiddeleteSpecies(constQString&speciesName,constint&rowIndex);private:QMap<QString,QStringList>m_list={{"Feline",{"Tigress","Waai Fuu"}},{"Fox",{"Carmelita","Diane","Krystal"}},{"Goat",{"Sybil","Toriel"}}};staticQStringformatList(constQStringList&list);};
With a matching implementation in src/components/model.cpp:
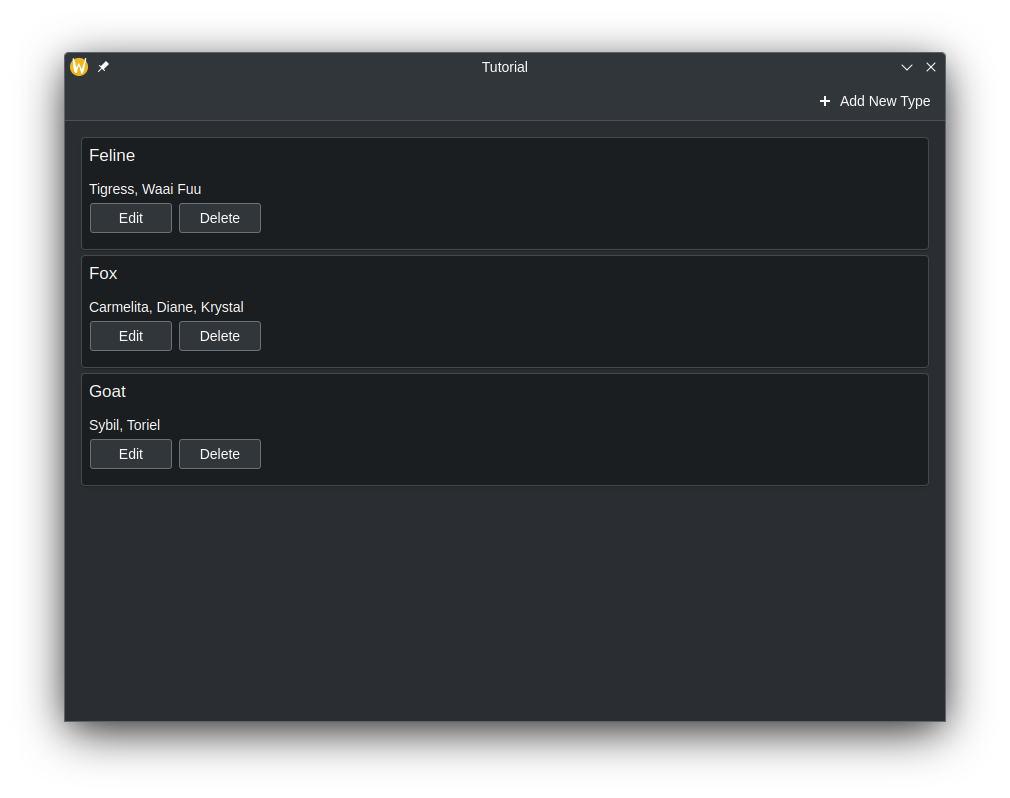
Now, let's update the application so a "Delete" button appears in a RowLayout alongside the edit button inside our AbstractCard, and hook it up to our delete method.
importorg.kde.kirigamiasKirigamiimportorg.kde.tutorial.componentsKirigami.Page{title:"Exposing to QML Tutorial"Kirigami.Heading{anchors.centerIn:parenttext:Backend.introductionText}}
src/components/backend.h
1
2
3
4
5
6
7
8
9
10
11
12
13
14
15
16
17
18
19
#pragma once
#include<QObject>#include<qqmlintegration.h>classBackend:publicQObject{Q_OBJECTQML_ELEMENTQML_SINGLETONQ_PROPERTY(QStringintroductionTextREADintroductionTextWRITEsetIntroductionTextNOTIFYintroductionTextChanged)public:explicitBackend(QObject*parent=nullptr);QStringintroductionText()const;voidsetIntroductionText(constQString&introductionText);Q_SIGNALvoidintroductionTextChanged();private:QStringm_introductionText=QStringLiteral("Hello World!");};
importQtQuickimportQtQuick.LayoutsimportQtQuick.ControlsasControlsimportorg.kde.kirigamiasKirigamiimportorg.kde.tutorial.componentsKirigami.ScrollablePage{title:"C++ models in QML"actions:[Kirigami.Action{icon.name:"list-add-symbolic"text:"Add New Species"onTriggered:{addPrompt.open();}}]Model{id: customModel}ColumnLayout{anchors.left:parent.leftanchors.right:parent.rightRepeater{model:customModeldelegate:Kirigami.AbstractCard{Layout.fillHeight:trueheader:Kirigami.Heading{text:model.specieslevel:2}contentItem:Item{implicitWidth:delegateLayout.implicitWidthimplicitHeight:delegateLayout.implicitHeightColumnLayout{id: delegateLayoutControls.Label{text:model.characters}RowLayout{Layout.fillWidth:trueControls.Button{text:"Edit"onClicked:{editPrompt.text=model.characters;editPrompt.model=model;editPrompt.open();}}Controls.Button{text:"Delete"onClicked:{customModel.deleteSpecies(model.species,index);}}}}}}}}Kirigami.PromptDialog{id: addPrompttitle:"Add New Species"standardButtons:Kirigami.Dialog.OkonAccepted:{customModel.addSpecies(addPromptText.text);addPromptText.text="";// Clear TextField every time it's done
addPrompt.close();}Controls.TextField{id: addPromptTextLayout.fillWidth:trueonAccepted:addPrompt.accept()}}Kirigami.PromptDialog{id: editPromptpropertyvarmodelpropertyaliastext:editPromptText.texttitle:"Edit Characters"standardButtons:Kirigami.Dialog.Ok|Kirigami.Dialog.CancelonAccepted:{constmodel=editPrompt.model;model.characters=editPromptText.text;editPrompt.close();}Controls.TextField{id: editPromptTextonAccepted:editPrompt.accept()}}}
#pragma once
#include<QAbstractListModel>#include<qqmlintegration.h>classModel:publicQAbstractListModel{Q_OBJECTQML_ELEMENTpublic:enumRoles{SpeciesRole=Qt::UserRole,CharactersRole};introwCount(constQModelIndex&)constoverride;QHash<int,QByteArray>roleNames()constoverride;QVariantdata(constQModelIndex&index,introle)constoverride;boolsetData(constQModelIndex&index,constQVariant&value,introle)override;Q_INVOKABLEvoidaddSpecies(constQString&species);Q_INVOKABLEvoiddeleteSpecies(constQString&speciesName,constint&rowIndex);private:QMap<QString,QStringList>m_list={{"Feline",{"Tigress","Waai Fuu"}},{"Fox",{"Carmelita","Diane","Krystal"}},{"Goat",{"Sybil","Toriel"}}};staticQStringformatList(constQStringList&list);};