Hello World!
Abstract
Your first program shall greet the world with a friendly "Hello World". For that, we will use a KMessageBox and customize one of its buttons.
Note
To get more information about any class you come across, you can use KDE's API Reference site. It can be quickly accessed via KRunner with thekde: search keyword (e.g. kde: KMessageBox). You may also find it useful to consult Qt's documentation with qt:, since much of KDE's Frameworks builds upon it.Preparation
We are going to discuss some basic code, and in the final section we will build it. You will need to set up your development environment (so that you can use the KDE Frameworks) first. You can do that in two ways.
Create a folder ~/kde/src/kxmlgui-tutorial. In that folder you will place the source code files from this tutorial.
Using kde-builder
Set up your development environment with kde-builder. That will give you the necessary development tools and underlying libraries, and build the KDE Frameworks from scratch.
Add the following to the end of your ~/.config/kde-builder.yaml:
project kxmlgui-tutorial:
  no-src: true
⏳ With kdesrc-build...
Click here to know how this was done with kdesrc-build
This step used to be done by writing to ~/.config/kdesrc-buildrc instead with a different syntax:
# after include ${module-definitions-dir}/kf6-qt6.ksb
module kxmlgui-tutorial
  no-src
end module
Manually
 Manjaro Manjaro Arch Arch | sudo pacman -S kcoreaddons ki18n kxmlgui ktextwidgets kconfigwidgets kwidgetsaddons kio kiconthemes |
 OpenSUSE OpenSUSE | sudo zypper install kf6-kcoreaddons-devel kf6-ki18n-devel kf6-kxmlgui-devel kf6-ktextwidgets-devel kf6-kconfigwidgets-devel kf6-kwidgetsaddons-devel kf6-kio-devel kf6-kiconthemes-devel |
 Fedora Fedora | sudo dnf install kf6-kcoreaddons-devel kf6-ki18n-devel kf6-kxmlgui-devel kf6-ktextwidgets-devel kf6-kconfigwidgets-devel kf6-kwidgetsaddons-devel kf6-kio-devel kf6-kiconthemes-devel |
The Code
Hello World
All the code we need will be in one file, main.cpp. We'll start simple and increment our file as we go further. Create it with the code below:
| |
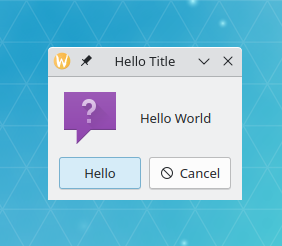
Our popup box is a KMessageBox, which has primarily two buttons: a PrimaryAction, which usually serves as a confirmation button, and a SecondaryAction, which usually portrays a different action, like a cancel or discard button. The popup box uses the KMessageBox class, the primary action uses a custom KGuiItem with the text "Hello", and the secondary action uses KStandardGuiItem::cancel().
First we need to create a QApplication object. It needs to be created exactly once and before any other KDE Frameworks or Qt object, as it is the starting point for creating your application and thus required for other components, like Ki18n for translations.
The first argument of the KGuiItem constructor is the text that will appear on the item (in our case, a button object to be used soon). Then we have the option to set an icon for the button, but for now we don't want one so we can pass an empty QString using QString(). We then set the tooltip (the text that appears when you hover over an item), and finally the "What's This?" text (accessed through right-clicking or Shift-F1).
Now that we have the item needed for our primary action button, we can create our popup with KMessageBox::questionTwoActions(). The first argument is the parent widget of the KMessageBox, which is not needed for us here, so we pass nullptr. The second argument is the text that will appear inside the message box and above the buttons, in our case, "Hello World". The third is the caption shown in the window's titlebar, "Hello Title". Then, we set our custom KGuiItem, primaryAction. Lastly, we add a convenience object with KStandardGuiItem::cancel(), which returns a ready-made KGuiItem with localized text and cancel functionality, satisfying the function signature.
Important
Using a QStringLiteral for strings likeQStringLiteral("Hello World!") instead of literals like "Hello World!" is both a best practice in Qt programming and an expected coding practice in KDE software.About and Internationalization
| |
For your application to be localized, we must first prepare our code so that it can be adapted to various languages and regions without engineering changes: this process is called internationalization. KDE uses Ki18n for that, which provides KLocalizedString.
We start with a call to KLocalizedString::setApplicationDomain(), which is required to properly set the translation catalog and must be done before everything else (except the creation of the QApplication instance). After that, we can just start enveloping the relevant user-visible, translatable strings with i18n(). The non-user visible strings that do not need to be translated should use a QStringLiteral instead. We'll use those next with KAboutData.
More information on internalization can be found in the programmer's guide for internationalization.
Important
Since we are about to use many string arguments, instead of writing QStringLiteral() 7 times, we can use QString's operator""_s, a shorter notation for string literals special to Qt that does the same thing. This is also where the using namespace Qt::Literals::StringLiterals; comes from.
So instead of QStringLiteral("Hello World!"), just typing u"Hello World!"_s is enough.
KAboutData is a core KDE Frameworks component that stores information about an application, which can then be reused by many other KDE Frameworks components. We instantiate a new KAboutData object with its fairly complete default constructor and add author information. After all the required information has been set, we call KAboutData::setApplicationData() to initialize the properties of the QApplication object.
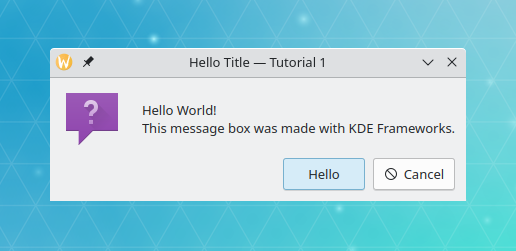
Note how the message box adapts to its own contents, and how the window title now includes "Tutorial 1", like we set using KAboutData. This property can then be accessed with KAboutData::displayName() when needed.
One more thing of note is that, if you are using a different system language, the KStandardGuiItem::cancel() button we created will likely already show up in your language instead of saying "Cancel".
Command line
| |
Then we come to QCommandLineParser. This is the class one would use to specify command line flags to open your program with a specific file, for instance. However, in this tutorial, we simply initialize it with the KAboutData object we created before so we can use the --version or --author flags that are provided by default by Qt.
We're all done as far as the code is concerned. Now to build it and try it out.
Compiling and running the project
In order to run our project, we need a build system in place to compile and link the required libraries; for that, we use the industry standard CMake, together with files in our project folder called CMakeLists.txt.
Writing a CMakeLists.txt
Create a file named CMakeLists.txt in the same directory as main.cpp with this content:
| |
The find_package() function locates the package that you ask it for (in this case ECM, Qt6, or KF6) and sets some variables describing the location of the package's headers and libraries. ECM, or Extra CMake Modules, is required to import special CMake files and functions for building KDE applications.
Here we try to find the modules for Qt 6 and KDE Frameworks 6 required to build our tutorial. The necessary files are included by CMake so that the compiler can see them at build time. Minimum version numbers are set at the very top of CMakeLists.txt file for easier reference.
Then we use add_executable() to create an executable called helloworld. Afterwards, we link our executable to the necessary libraries using the target_link_libraries() function. The install() function call creates a default "install" target, putting executables and libraries in the default path using a convenience macro KDE_INSTALL_TARGETS_DEFAULT_ARGS provided by ECM. Additionally, just by including ECM, an "uninstall" target automatically gets created based on this "install" target.
Compiling and running with kde-builder
Compile the necessary build dependencies with kde-builder, then compile kxmlgui-tutorial by running the following commands in a terminal:
kde-builder kcoreaddons ki18n kxmlgui ktextwidgets kconfigwidgets kwidgetsaddons kio kiconthemes
kde-builder kxmlgui-tutorial
You can then run the application with:
kde-builder --run helloworld⏳ With kdesrc-build...
Click here to know how this was done with kdesrc-build
In this case, the build process will result in an executable that does not match the project name: for example, the project kxmlgui-tutorial does not match the executable helloworld. Because kdesrc-build had no way to associate the name of the project with the executable name, you needed to use the --exec or -e flag:
kdesrc-build --run --exec helloworld kxmlgui-tutorialCompiling and running manually
Change directories to the project's root folder, then run the following command in a terminal:
cmake -B build/ --install-prefix ~/.local
cmake --build build/ --parallel
cmake --install build/
Each line above matches a step of the compilation process: the configuration, build, and install steps.
The --parallel flag lets CMake compile multiple files at the same time, and the --install-prefix flag tells CMake where it will be installed. In this case, the executable helloworld will be installed to ~/.local/bin/helloworld.
You can then run the application with:
helloworldYou can also run the binary with flags. The flag --help is a standard flag added by Qt via QCommandLineParser, and the content of the --version, --author and --license flags should match the information we added with KAboutData.
kde-builder --run helloworld --help
kde-builder --run helloworld --version
kde-builder --run helloworld --author
kde-builder --run helloworld --license
or
helloworld --help
helloworld --version
helloworld --author
helloworld --license