Setup with Python
Prerequisites
Before getting started, we will need to install Kirigami and PySide on our machine.
 Manjaro Manjaro Arch Arch | sudo pacman -S python-pipx python-pyqt6 pyside6 kirigami flatpak-builder qqc2-desktop-style appstream |
 OpenSUSE OpenSUSE | sudo zypper install python3-pipx python3-qt6 python3-pyside6 kf6-kirigami-devel flatpak-builder kf6-qqc2-desktop-style AppStream-compose |
 Fedora Fedora | sudo dnf install pipx python3-pyqt6 python3-pyside6 kf6-kirigami-devel flatpak-builder kf6-qqc2-desktop-style appstream-compose |
If you are on a distribution with old PySide6 or PyQt6 packages, this tutorial works with Building software with distrobox.
Project structure
First we create our project folder (you can use the commands below). We are going to call ours kirigami_python/.
kirigami_python/
├── README.md
├── LICENSE.txt
├── MANIFEST.in                        # To add our QML files
├── pyproject.toml                     # The main file to manage the project
├── org.kde.kirigami_python.desktop
└── src/
    ├── __init__.py                    # To import the src/ directory as a package
    ├── __main__.py                    # To signal app as the entrypoint
    ├── app.py
    └── qml/
        └── Main.qml
The package name is going to be kirigami_python, the "executable" (console script) will be called kirigami_hello, and the entrypoint will be app.
Tip
To quickly generate this folder structure, just run:mkdir -p kirigami_python/src/qml/.For a more comprehensive project that goes into further detail about this file structure, see Full project in Python + Kirigami.
pyproject.toml
Modern Python applications need only a single TOML file to specify all metadata, package information and dependencies as of PEP 621. The following serves as a good starter for an application and can be extended later.
Most of the contents in this file are boilerplate, and a more complete version of it can be seen in Python with Kirigami: General Structure.
| |
Note the highlighted lines. As mentioned under Project structure, the name of the package is kirigami_python, the name of the executable is kirigami_hello, and the name of the entrypoint is app. In particular, the following should be noted:
- The project script consists of an entrypoint script that will be generated by setuptools for the application to run, in this case
kirigami_hello. - The generated project script
kirigami_helloruns themain()function in theapp.pyscript in thekirigami_pythonpackage. - The default
package-dirfor Python projects is usually the root directory. In this case, this is overridden with thesrc/subdirectory so it acts like it is the root directory of the package. - The
package-diris why the generated project script doeskirigami_python → appinstead ofkirigami_python → src → app. - The
package-diris also why theimportlib.resources.files()call in app.py doeskirigami_python → qml → Main.qmlinstead ofkirigami_python → src → qml → Main.qml.
See Running directly, as a module, and as a console script for details.
org.kde.kirigami_python.desktop
The primary purpose of Desktop Entry files is to show your app on the application launcher on Linux. Another reason to have them is to have window icons on Wayland, as they are required to tell the compositor "this window goes with this icon".
It must follow a reverse-DNS naming scheme followed by the .desktop extension such as org.kde.kirigami_python.desktop:
| |
Note
Window and taskbar icons will work in a Wayland session only if apps' desktop files are placed in~/.local/share/applications or /usr/share/applications. To get icons working in this tutorial, copy the app's desktop file there.MANIFEST.in
This file is simply a declaration of additional source code files that should be present in the package when the application runs. Python by default doesn't include QML files in packages, and they need to be available in order for the application to run.
| |
src/app.py
| |
Since this is a GUI application, we want the main function to only run when the script is run, not when it's imported, so we need the if __name__ == "__main__" condition at the end of the file. See Running directly, as a module, and as a console script for details.
We create a QGuiApplication and initialize the QML engine, and with QGuiApplication.exec() the application will keep running until closed. Then importlib.resources.files() grabs the path to a file that is present in the package, namely our Main.qml. With that path, we load the QML file into the QML engine as the main entrypoint for the application interface.
src/__init__.py
Create an empty kirigami_python/src/__init__.py file. This file just needs to be present in order to import a directory as a package.
touch __init__.pysrc/__main__.py
Create a kirigami_python/src/__main__.py with the following contents:
| |
This simply adds the contents of the current directory (src/) and imports it as a module named app, then immediately runs the main() function of the application.
src/qml/Main.qml
| |
Here's where we will be handling our application's frontend.
If you know some Javascript, then much of QML will seem familiar to you (though it does have its own peculiarities). Qt's documentation has an extensive amount of material on this language if you feel like trying something on your own. Over the course of these tutorials we will be focusing much of our attention on our QML code, where we can use Kirigami to get the most out of it.
For now, let's focus on Main.qml. First we import a number of important modules:
- QtQuick, the standard library used in QML applications.
- QtQuick Controls, which provides a number of standard controls we can use to make our applications interactive.
- QtQuick Layouts, which provides tools for placing components within the application window.
- Kirigami, which provides a number of components suited for creating applications that work across devices of different shapes and sizes.
Note
Putting the QtQuick Controls and Kirigami imports into separate namespaces using theas keyword is a best practice that ensures no components with the same name can conflict. You might see different names for QtQuick Controls in the wild, such as "QQC" or "QQC2". We will be using "Controls" in this tutorial for clarity.We then come to our base element, Kirigami.ApplicationWindow, which provides some basic features needed for all Kirigami applications. This is the window that will contain each of our pages, the main sections of our UI.
We then set the window's id property to "root". IDs are useful because they let us uniquely reference a component, even if we have several of the same type.
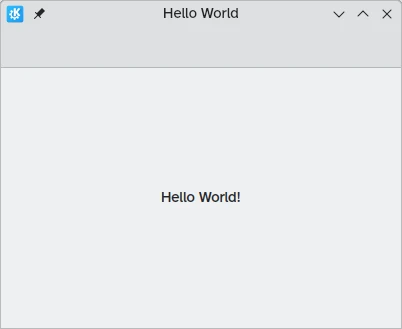
We also set the window title property to "Hello World".
We then set the first page of our page stack. Most Kirigami applications are organised as a stack of pages, each page containing related components suited to a specific task. For now, we are keeping it simple, and sticking to a single page. pageStack is an initially empty stack of pages provided by Kirigami.ApplicationWindow, and with pageStack.initialPage: Kirigami.Page {...} we set the first page presented upon loading the application to a Kirigami.Page. This page will contain all our content.
Finally, we include in our page a Controls.Label that lets us place text on our page. We use anchors.centerIn: parent to center our label horizontally and vertically within our parent element. In this case, the parent component of our label is Kirigami.Page. The last thing we need to do is set its text: text: "Hello World!".
Running the application
You can run the kirigami_hello console script without needing to install it first:
pipx run --system-site-packages --spec . kirigami_helloThe flag --system-site-packages is needed to make Python have access to the Python packages from your distribution. This is required because Kirigami and PySide need to have been built against the same Qt version to work, which is the case when both of them come from the distribution.
The flag --spec determines the path to the source code or wheel package that has the program, and kirigami_hello is the executable script to be run.
To build and install the Python package, run:
pipx install --force --system-site-packages .The package will be installed to ~/.local/share/pipx/venvs/kirigami-python, and an executable script will be installed to ~/.local/bin/kirigami_hello.
Use of pipx versus pip
Unlike Python with Kirigami: Creating a Python package, this tutorial used pipx to make the project easier to run and install. The same steps can be done manually with venv, build and pip as in the more complete tutorial.
pipx is useful and recommended as per PEP 668 for running Python applications, while pip is multi-purpose and can also be used for importable Python modules.
After this, the application can be launched by running:
kirigami_helloTo run the new QML application in mobile mode, you can use QT_QUICK_CONTROLS_MOBILE=1:
QT_QUICK_CONTROLS_MOBILE=1 kirigami_helloVoilà! Now you will see your very first Kirigami app appear before your very own eyes.