Set up a development environment
Source code for KDE software lives on KDE Invent. Before you can work on it, you'll need to set up a development environment: a set of tools that allows you to access and edit the source code, compile it into a form that the computer can run, and deploy it to a safe location. To accomplish this, you will need to enter commands using a terminal program.
If you're not familiar with the command line interface, you can find tutorials here. However, advanced command line skills are not required, and you will learn what you need along the way.
If you're a visual learner, we also provide useful video tutorials.
The tool we will be using here for setting up a development environment and building KDE software is kde-builder. It will let you set up your development environment and compile applications on Linux and FreeBSD. You can find out more about it in its repository and the README.
💡 Keep in mind
You only need to set up your environment once, and then you will be able to compile (and recompile) KDE software as often as needed later on.Why kde-builder?
kde-builder is the official KDE meta build system tool. It is used to manage the building of many software repositories in an automated fashion.
Its primary purpose is to manage dependencies. Every software has dependencies: other pieces of software that provide lower-level functionality they rely on. In order to compile any piece of software, its dependencies must be available.
KDE software has two types of dependencies:
- dependencies on other pieces of KDE software
- dependencies on 3rd-party software
For example, the KDE application KCalc depends on more than 20 other KDE libraries as well as the Qt toolkit.
Some Linux distributions do not provide development packages for KDE Frameworks and of other libraries that are up-to-date enough for us to build from the master branch of the KDE git repositories (the branch where the development of the next software versions takes place), so we use kde-builder to compile them ourselves. The goal is to avoid using KDE binaries, KDE libraries and other KDE files from the operating system where possible.
Set up kde-builder
Before setting things up, you will need to make sure you have some free disk space. kde-builder itself is a very lightweight tool, but downloading the source code of lots of software, generating build artifacts during compilation, and installing the necessary files takes space.
If you plan on building an application or on following our Kirigami tutorial, you should allocate at least 15 GB of storage space.
If you plan on building Plasma Desktop, you should allocate at least 50 GB of storage space.
If you cannot afford this storage, you might want to consider building projects manually or with distrobox.
Then run the following:
cd ~
curl 'https://invent.kde.org/sdk/kde-builder/-/raw/master/scripts/initial_setup.sh' > initial_setup.sh
bash initial_setup.sh
kde-builder will install git, a few runtime packages, and will install its executable in your PATH so you can run it from the terminal, as in the next step.
~/.local/bin to the PATH environment variable. The kde-builder installer will tell you if this is required.After the initial setup, you will need to generate a configuration file for kde-builder. Run:
kde-builder --generate-configThis will create a new file ~/.config/kde-builder.yaml. See the documentation for a list of available options.
Debian/Ubuntu-based distributions
Some distributions need source repositories enabled before you can install the development packages you need. Do that now, if needed:
Click here to see how to enable source repos
If the file /etc/apt/sources.list exists
Open the file /etc/apt/sources.list with a text editor such as Kate or nano. Each line that starts with deb should be followed by a similar line beginning with deb-src , for example:
deb http://us.archive.ubuntu.com/ubuntu/ noble main restricted
deb-src http://us.archive.ubuntu.com/ubuntu/ noble main restricted
Note: The URL might differ depending on your country, and instead of noble the name of the Debian or Ubuntu version should appear instead, for example bookworm or jammy.
If the deb-src line is commented out with a #, remove the # character.
Lastly, run:
sudo apt updateIf the file /etc/apt/sources.list does not exist
Starting with Kubuntu 24.04, the configuration file for apt repositories has moved to /etc/apt/sources.list.d/ubuntu.sources.
Open the file /etc/apt/sources.list.d/ubuntu.sources with an editor like Kate or nano. Change the contents of the file by replacing all occurrences of Types: deb with Types: deb deb-src. For example, replacing the following:
Types: deb
URIs: http://archive.ubuntu.com/ubuntu
Suites: noble noble-updates noble-backports
Components: main universe restricted multiverse
Signed-By: /usr/share/keyrings/ubuntu-archive-keyring.gpg
With:
Types: deb deb-src
URIs: http://archive.ubuntu.com/ubuntu
Suites: noble noble-updates noble-backports
Components: main universe restricted multiverse
Signed-By: /usr/share/keyrings/ubuntu-archive-keyring.gpg
Note: The URL might differ depending on your country, and instead of noble the name of the Debian or Ubuntu version should appear instead, for example bookworm or jammy.
Lastly, run:
sudo apt updateDuring initial setup, kde-builder installed the essentials to run the tool itself. To install the distribution packages required to actually build KDE software, run:
kde-builder --install-distro-packagesFinally, perform your first build:
kde-builder kcalcThis will build KCalc, a calculator app, and its KDE dependencies. If you happen to find any build issues, don't fret! That means kde-builder is working.
In the next section, Building KDE software with kde-builder, we have a more in-depth look into the build process. To solve any build issues, you can check out Installing build dependencies.
kde-builder is now set up for building! 🎉
💡 A chance to contribute
If you discover any external dependencies needed to build KDE software that were not installed withkde-builder --install-distro-packages, for example using our guide on Installing Build Dependencies, please send a merge request to the repo-metadata/distro-dependencies repository to include the needed packages in the list.Updating kde-builder
You should occasionally update kde-builder to get its latest changes.
This can be done by running
kde-builder --self-updateIf this does not work, your version of kde-builder does not support updating itself yet. In this case, you can update it by running
cd ~
bash initial_setup.sh
Setting up Qt
Qt is the fundamental framework that is needed for all KDE development. A recent enough version of Qt6 is required to proceed.
Any of the recommended, sufficiently up-to-date Linux distributions listed in Building KDE software should have recent enough Qt6.
The initial setup of kde-builder should have installed the required Qt6 packages for you already, in which case you DON'T need to do anything and may skip directly to the Configure git section.
If your Linux distribution does NOT provide a recent enough version of Qt, see the dedicated page Setting up Qt.
Configure git
To properly track who created a commit, your name and email must be configured in git. If this is not done correctly, invent.kde.org might reject your changes when you push them. To configure name and email, run:
git config --global user.name "Your Name"
git config --global user.email "you@email.com"
The name given here must be a human name, not the username of your KDE account or similar. The email should be the same as configured in GitLab and for your account on bugs.kde.org, if you have one. This is required for some integrations to work correctly.
You should take the chance to create a KDE Identity account that you can use to access KDE's Gitlab instance where all KDE code resides, Invent. Take a look at Infrastructure: GitLab to learn more about this.
For convenience, you can enable a feature that will become useful when starting to push code to GitLab:
git config --global push.autoSetupRemote trueNext, in order to authenticate yourself when pushing code changes, you need to add an SSH key to your Invent profile as described in the Invent SSH documentation. Once you are done, we can start using kde-builder.
Disable indexing for your development environment
You'll want to disable indexing for your development-related git repos and the files they will build and install.
To do that, add the ~/kde directory to the exclusions list in System Settings › Search › File Search > Stop Indexing a Folder...
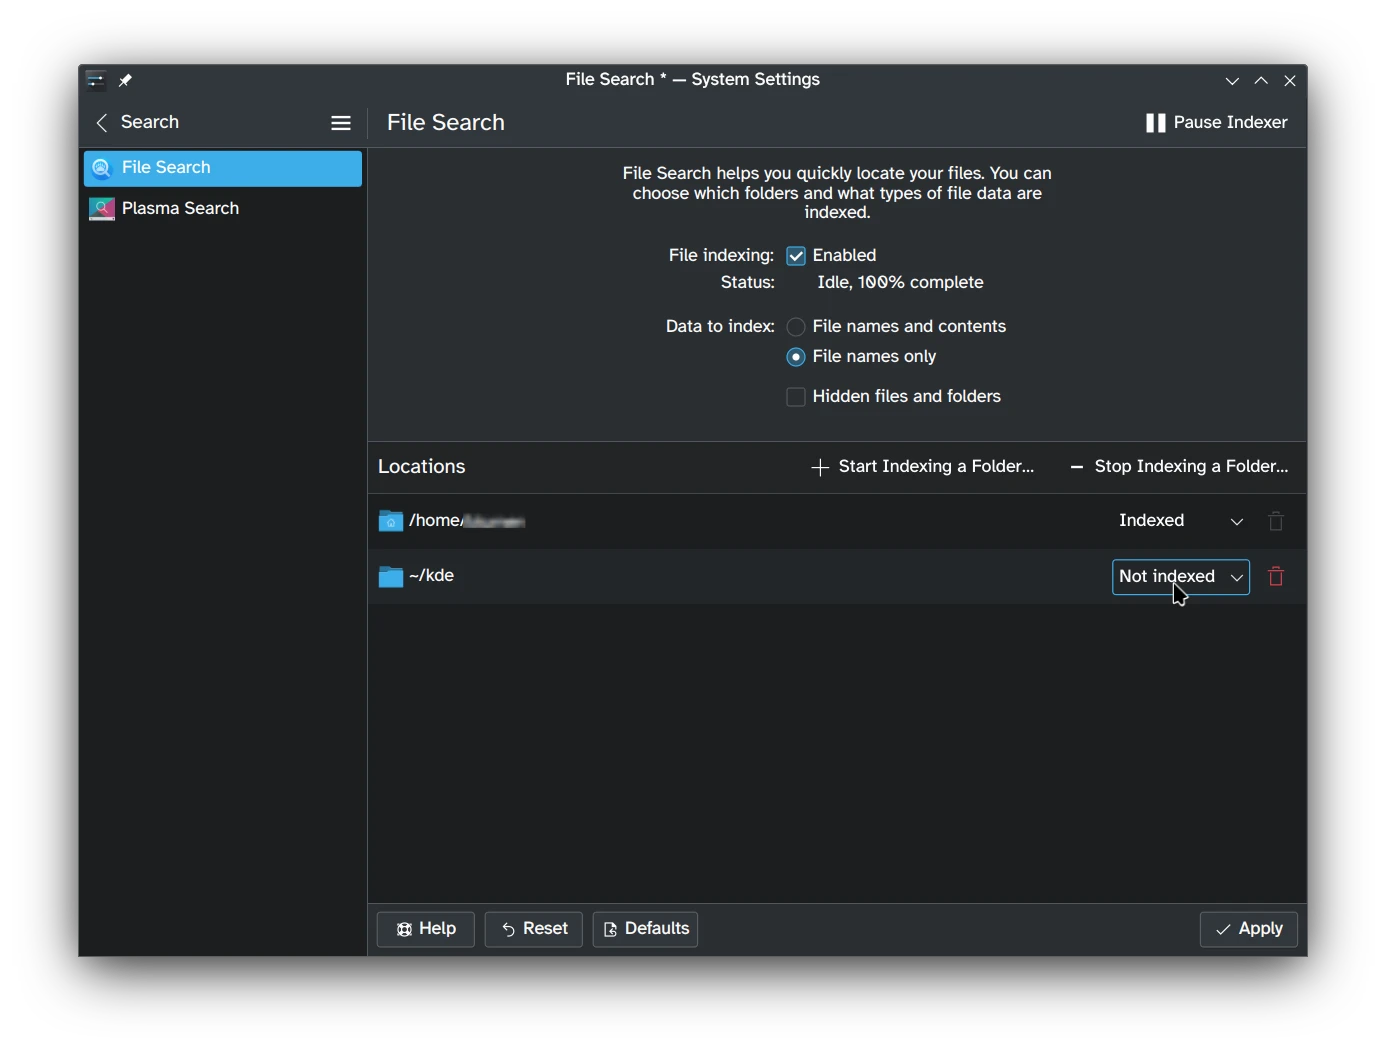
The Search field in System Settings.
Next Steps
Your development environment is now set up and ready to build software.
- You installed kde-builder.
- You generated a configuration file for it.
- You installed the necessary packages to start building KDE software.
- You have set it up to use Qt (optional).
- You have set up git so you can start working on code.
The next section explains how to use kde-builder to build software from source code.