Creating sensor faces
Folder structure
A sensor face consists of multiple parts of which some are required and others are optional. The folder structure looks like this and is similar to the one of Plasma widgets:
rootdir
├── contents
│   ├── ui
│   │   ├── FullRepresentation.qml (required)
│   │   ├── CompactRepresentation.qml (required)
│   │   └── Config.qml (optional)
│   └── config
│       └── main.xml (optional)
├── metadata.json (required)
└── faceproperties (required)
The most interesting files are FullRepresentation.qml and CompactRepresenation.qml. They contain
the elements that are used to display the data of the different Sensors. Config.qml represents
a user interface to configure the face specific settings which are described in the main.xml file
in KConfig XT syntax. The
faceproperties describe which features your face supports and metadata.desktop describes the
face and tells the system about it.
The visual representations
Both representations follow the same schema but are used in different contexts. The full representation is the one that is normally used and contains additional elements like for example a legend or a title. The compact representation on the other hand is used when something that takes much less space is required. One instance of this is when the systemmonitor widget is added to a panel in Plasma.
The root item of both representations has to be SensorFace. Assign the
root of your custom visualization to its contentItem property. SensorFace also allows to access
the face controller via the controller property. It tells the face which sensors to display and in
which way this should be done. The most important property of it is
highPrioritySensorIds, the UI refers to
it just as "Sensors". The data of these sensors should always be displayed by the face.
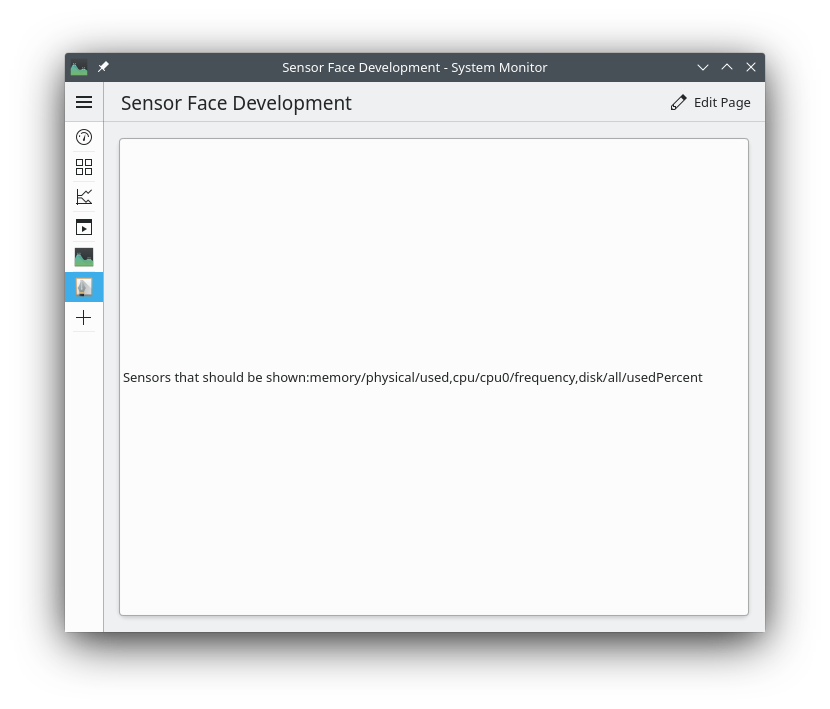
The following
very basic face displays just the ids of the sensors that should be shown:
import QtQuick.Controls 2.14
import org.kde.ksysguard.faces 1.0

SensorFace {
    contentItem: Label {
        text: "Sensors that should be shown:"
            +  controller.highPrioritySensorIds.join(",")
    }
}
Other interesting properties of the face controller are:
sensorColorsMaps sensor ids to colors. Use this if you need a sensor specific color for some element relating to a sensor.
lowPrioritySensorIdsA list of sensor Ids that are of lower importance than the normal sensors. Exposed as "Text-Only Sensors" because most faces display them just as text in the legend.
totalSensorsA list of sensors whose values represent totals of some sort. The pie chart face shows them in its center for example.
titleThe title of this face instance, can be empty
showTitleWhether the title should be displayed by the face
For a list of all available properties see SensorFaceController.
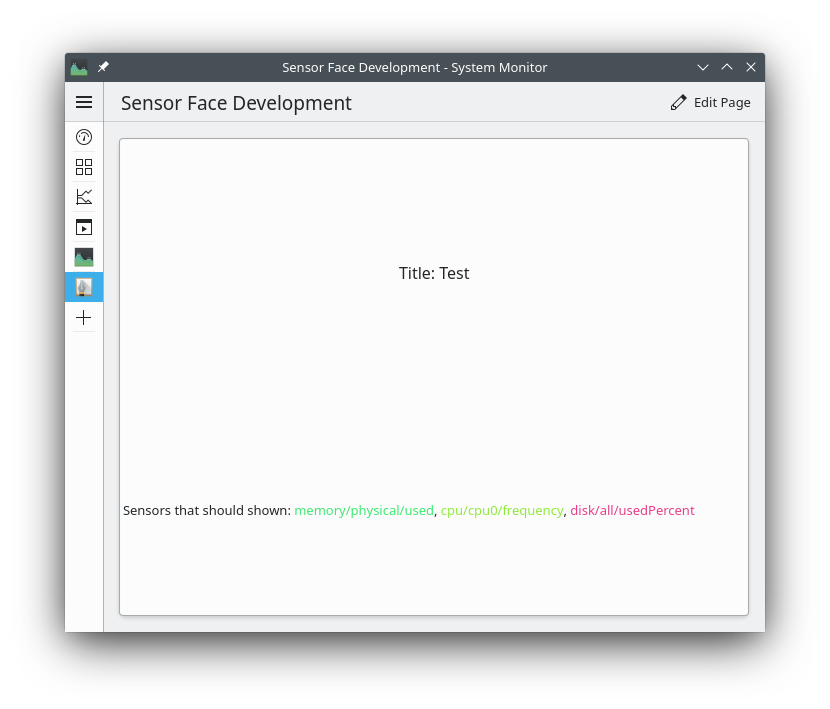
Using some of the above properties the basic sensor face from above can be iterated upon to also show a title and the color for each sensor:
import QtQuick 2.14
import QtQuick.Controls 2.14
import QtQuick.Layouts 1.14

import org.kde.kirigami 2.14 as Kirigami

import org.kde.ksysguard.faces 1.0 as Faces

Faces.SensorFace {
    contentItem: ColumnLayout {
        Kirigami.Heading {
            Layout.alignment: Qt.AlignHCenter
            text: "Title: " + controller.title
            visible: controller.showTitle
            level: 2
        }
        Label {
            text: "Sensors that should shown: "
                +  controller.highPrioritySensorIds.map(id => "<font color='" + controller.sensorColors[id] + "'>" + id + "</font>").join(", ")
        }
    }
}
Retrieving the data
The face controller supplies the list of sensor ids. To access more information about those sensors and to retrieve their current values, there are two options. We can instantiate a Sensor for each id and query the formattedValue or raw value and unit from it. It also contains the user visible name of the sensor and the range of possible values via minimum and maximum.
The second option is to pass the list of ids to a SensorDataModel and query the data from there. The list of sensors will be turned into a table with each column representing a sensor. The same properties as a Sensor has are exposed as the different roles of the model.
The following example shows both methods:
import QtQuick 2.14
import QtQuick.Controls 2.14
import QtQuick.Layouts 1.14

import org.kde.kirigami 2.14 as Kirigami

import org.kde.ksysguard.faces 1.0 as Faces
import org.kde.ksysguard.sensors 1.0 as Sensors

Faces.SensorFace {
    contentItem: ColumnLayout {
        Kirigami.Heading {
            Layout.alignment: Qt.AlignHCenter
            text: i18n("Title: %1, controller.title")
            visible: controller.showTitle
            level: 2
        }

        Label {
            text: i18n("We can use Sensor directly")
        }
        Repeater {
            model: controller.highPrioritySensorIds
            delegate: Label {
                text: i18n("%1: %2, sensor.name, sensor.formattedValue)
                color: controller.sensorColors[sensor.sensorId]

                Sensors.Sensor {
                    id: sensor
                    sensorId: modelData
                }
            }
        }

        Label {
            text: i18n("Or use a SensorDataModel")
        }
        Sensors.SensorDataModel {
            id: sensorModel
            sensors: controller.highPrioritySensorIds
        }
        TableView {
            id: table
            Layout.fillWidth: true
            Layout.preferredHeight: contentHeight
            contentWidth: width
            model: sensorModel
            delegate: Label {
                text: i18n("%1: %2", model.Name, model.FormattedValue)
                color: controller.sensorColors[model.SensorId]
            }
        }
    }
}
Adding a Legend
A legend is generally useful since it allows matching colors to a chart and precise reading of the
current value. ExtendedLegend is a premade
Component that displays a legend that is generated from a SensorDataModel assigned to its
sourceModel property. The
sensorIds property holds the ids of additional sensors that should be included in the
legend. Most sensor faces use this to display the "text only"
lowPrioritySensorIds. A typical usage
might look like this:
import QtQuick 2.14
import QtQuick.Controls 2.14
import QtQuick.Layouts 1.14

import org.kde.kirigami 2.14 as Kirigami

import org.kde.ksysguard.faces 1.0 as Faces
import org.kde.ksysguard.sensors 1.0 as Sensors

Faces.SensorFace {
    contentItem: ColumnLayout {
        Kirigami.Heading {
            Layout.alignment: Qt.AlignHCenter
            text: "Title: " + controller.title
            visible: controller.showTitle
            level: 2
        }

        Sensors.SensorDataModel {
            id: sensorModel
            sensors: controller.highPrioritySensorIds
            sensorColors: controller.sensorColors
        }

        // Here would be the face specific visualization

       Faces.ExtendedLegend {
            sourceModel: sensorModel
            sensorIds: controller.lowPrioritySensorIds
            Layout.fillWidth: true
        }
    }
}
Here the sensorColors that are supplied by the
controller are injected into the SensorDataModel via its sensorColors property so that the legend
includes the associated color of each sensor.
Adding configuration options
If the face contains configurable elements or display settings, can they be declared in the
main.xml file. A simple example could look like this:
<?xml version="1.0" encoding="UTF-8"?>
<kcfg xmlns="http://www.kde.org/standards/kcfg/1.0"
      xmlns:xsi="http://www.w3.org/2001/XMLSchema-instance"
      xsi:schemaLocation="http://www.kde.org/standards/kcfg/1.0
      http://www.kde.org/standards/kcfg/1.0/kcfg.xsd" >
    <kcfgfile name=""/>
    <group name="General">
        <entry name="showRectangle" type="Bool">
            <default>true</default>
        </entry>
        <entry name="rectangleText" type="String">
            <default>Rectangle</default>
        </entry>
    </group>
</kcfg>
It declares two options. A boolean option showRectangle that can either be true or false and
an option rectangleText that will hold some. By default the rectangle will
be shown and the text is "Rectangle". Options can have a multitude of types like
Int, StringList, Double, Color,.... The KConfigXT tutorial
gives a good introduction to the file format and the available data types.
The active configuration is exposed by the controller as faceConfiguration and the current values
of the options can be accessed as properties of it. As an example the following sensor face will
display a rectangle and the rectangleText on top of it if the showRectangle option has been set
to true:
import QtQuick 2.14
import org.kde.ksysguard.faces 1.0 as Faces

Faces.SensorFace {
    contentItem: Rectangle {
        visible: controller.faceConfiguration.showRectangle
        border.width: 2
        Text {
            text: controller.faceConfiguration.rectangleText
            anchors.centerIn: parent
        }
    }
}
To allow the user to change the declared options the face can provide the user interface in the
Config.qml file. In this simple example we would want to allow the user to configure the two options:
import QtQuick.Controls 2.14

import org.kde.kirigami 2.8 as Kirigami

Kirigami.FormLayout {

    property alias cfg_showRectangle: rectangleCheckbox.checked
    property alias cfg_rectangleText: rectangleTextEdit.text

    CheckBox {
        id: rectangleCheckbox
        text: "Show Rectangle"
    }
    TextField {
        Kirigami.FormData.label: "Rectangle Text"
        id: rectangleTextEdit
    }
}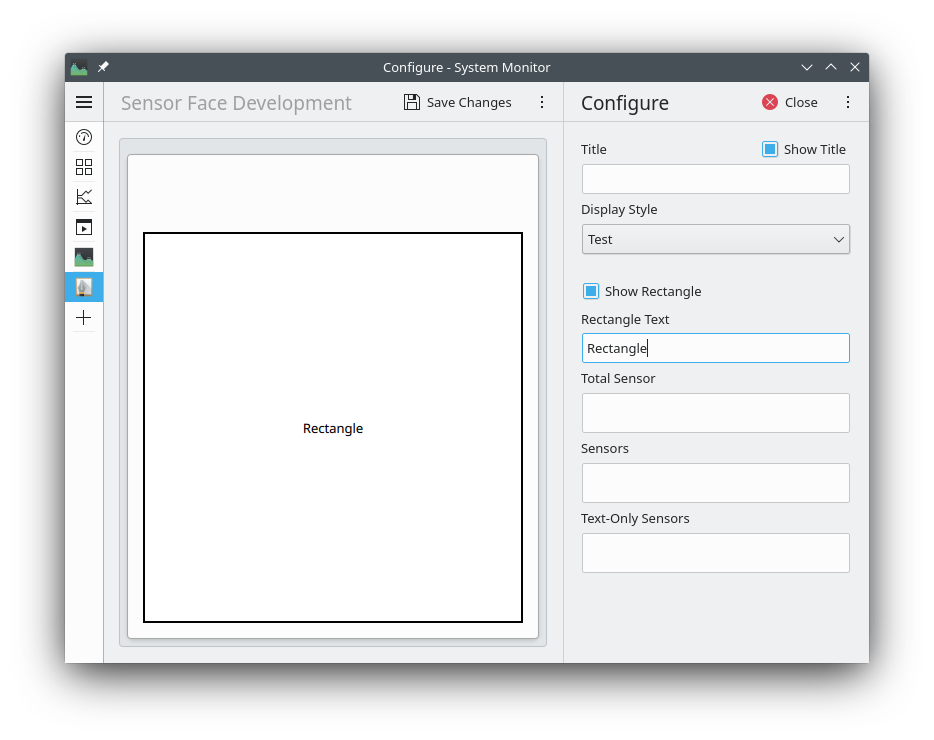
Here we have a checkbox that controls if the rectangle should be shown and a TextField in that the
user can enter the text shown in the Rectangle. Properties that are named like cfg_configOption
are automatically bound to the stored setting if configOption is a declared
configuration option. It is automatically set to the currently configured value and when it is changed
the controller will be notified that the setting has been changed. Here we just declared them to be
aliases for properties of controls but it is also possible to have normal properties with more
complicated bindings here.
If the configuration is changed the relevant property of controller.faceConfiguration is automatically
updated. Reading, saving and updating of the configuration is taken care of by the face controller and
does not need to be handled by the face.
Finishing it up
There are still two files that were omitted until now:
metadata.json
As the name implies it contains user-visible and not user-visible metadata about the face.
{
    "KPlugin": {
        "Authors": [
            {
                "Email": "your.name@mail.com",
                "Name": "Your Name"
            }
        ],
        "Icon": "office-chart-line",
        "Id": "org.kde.awesomeface",
        "License": "",
        "Name": "My awesome face",
        "Version": "1.0",
        "Website": ""
    },
    "X-KDE-ParentApp": "org.kde.plasmashell",
    "KPackageStructure": "KSysguard/SensorFace"
}
The first Name and Icon values are the user visible name and an icon that could be used for the face.
The Id is a unique identifier for the face.
See KPluginMetaData for the documentation about all the entries in the KPlugin object.
The KPackageStructure is needed for the plugin to be correctly found.
In case you have an existing plugin that uses a metadata.desktop file, you can follow the migration instructions from the Widget Properties documentation.
faceproperties
Not every face supports displaying every feature that is exposed as the properties of
the face controller. A face can indicate this with the file faceproperties
so that UI elements can be hidden for example when configuring the face depending on whether they
are supported or not. The file format is a first line [Config] followed by key-value-pairs.
Possible keys are: SupportsSensorsColors, SupportsTotalSensors, SupportsLowPrioritySensors,
and MaxTotalSensors. By default it is assumed that a face does not support these features and
that MaxTotalSensors is 1 when total sensors are supported.
As an example, consider:
[Config]
SupportsSensorsColors=false
SupportsTotalSensors=true
MaxTotalSensors=2
This face does not support sensor colors which is declared explicitly and also does not support
low priority sensors because the default is false. It however supports display of two total sensors
Installation
To enable applications finding a face it needs to be installed into a specific directory. This is typically
/usr/share/ksysguard/sensorfaces/ for system installed faces or ~/.local/share/ksysguard/sensorfaces/.
Additionally the root folder has to have the same name as the plugin Id specified in the metadata.
If the face is distributed through the KDE Store
and installed using the relevant tools, installation is handled automatically.
Further topics
- When creating faces that utilize charts the KQuickCharts framework includes facilities to easily create charts from Qml