Using Akonadi in applications
This tutorial will guide you through the steps of creating an Akonadi application from scratch. This powerful framework allow us to easily display and manipulate personal information management (PIM) data. We will use it to create a simple QML and Kirigami application that will allow the user to view their emails.
Warning
This tutorial assumes you have some prior knowledge of Qt Model/View programming. Akonadi makes heavy use of models and proxy models to display information.Preparation
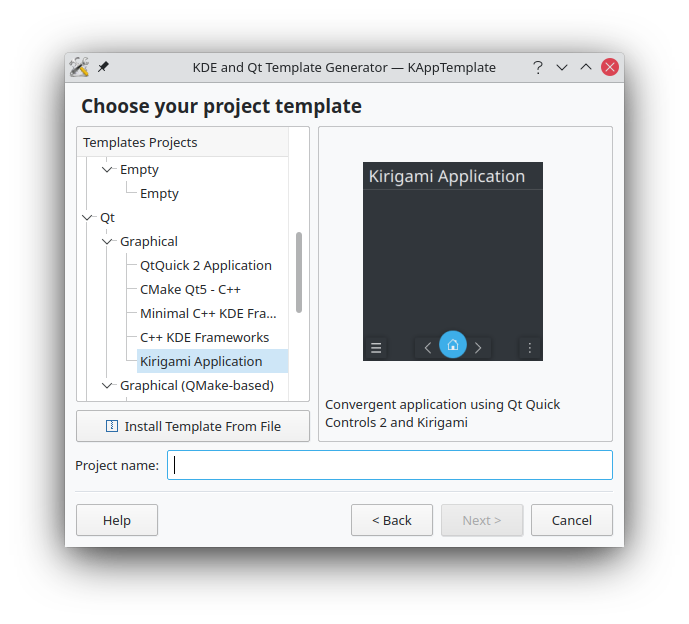
We can kick-start the application by using KAppTemplate, which can be
found as "KDE template generator" in the development section of the application launcher menu,
or by running kapptemplate in a terminal window.
First, we select the Kirigami Application in the Qt → Graphical section of the program. We can then give our project a name and continue through the following pages of the wizard to complete the template creation.
A look at the generated project's top level directory shows us the following files:
CMakeLists.txt
src/
org.example.quickmail.appdata.xml
org.example.quickmail.desktop
and the following files can be found in the sub directory src:
CMakeLists.txt
contents
main.cpp
resources.qrc
At this stage, it is already possible to compile the application, so we can already check if our development environment is set up correctly by creating the build directory and having CMake either generate Makefiles or import the project in KDevelop.
Generating Makefiles
Generating our makefile is as easy as entering the project's top-level directory...
mkdir build
cd build
cmake -DCMAKE_BUILD_TYPE=debugfull ..
...and running the build using make as usual.
Adjusting the project dependencies
First thing's first: we need to add the Akonadi dependencies to the CMakeLists.txt files in both the top-level directory and in the the src directory.
Add the following line to the file in the top-level directory:
set(LIBKDEPIM_VERSION "5.16.0")

# Find KdepimLibs Package
find_package(KF5Akonadi ${LIBKDEPIM_VERSION} CONFIG REQUIRED)
find_package(KF5Libkdepim ${LIBKDEPIM_VERSION} CONFIG REQUIRED)
and add a new target library in src/CMakeLists.txt
target_link_libraries(quickmail
    ...
    KF5::AkonadiCore
    KF5::AkonadiAgentBase
    KF5::AkonadiWidgets
    KF5::AkonadiXml
)
Creating the main class
The usual way to expose information to the QML engine is by creating QObjects and use then use these to expose Q_PROPERTIES. So let's create a simple QuickMail class inside src/quickmail.{h,cpp} and then add our new cpp file to the targets in src/CMakeLists.txt.
// src/quickmail.h

#pragma once
#include <QObject>

class QuickMail : public QObject
{
    Q_OBJECT

public:
    QuickMail(QObject *parent = nullptr) : QObject(parent) {}
};
We then make it available to the QML engine as a singleton.
// src/main.cpp
int main(int argc, char *argv[])
{
    ...

    QuickMail mail;
    qmlRegisterSingletonInstance("org.kde.quickmail.private", 1, 0, "QuickMail", &mail);
}
Initialization
Since the application will depend on Akonadi, we have to make sure this is running before our application uses it. We can make sure this is the case by starting Akonadi if it is not already running. This is handled by the
Akonadi::Session
and the
Akonadi::ServerManager
classes. A Session will asynchronously start the Akonadi connection and the ServerManager instance will allow us to query the state of the connection. Once the server is loaded, we will notify the UI that it has loaded by setting the loading property to false.
namespace Akonadi {
    class Session;
}

// src/quickmail.cpp
class QuickMail : public QObject
{
    Q_OBJECT
    Q_PROPERTY(bool loading READ loading NOTIFY loadingChanged)

    ...
    bool loading() const;
    Akonadi::Session *session() const;

private:
    bool m_loading;
    Akonadi::Session *m_session;
};
In quickmail.cpp we need two new include directives:
#include <ServerManager>
#include <Session>
Then, in the constructor, we need to implement our Akonadi connection:
using namespace Akonadi;

QuickMail::QuickMail(QObject *parent)
    : QObject(parent)
    , m_loading(true)
{
    m_session = new Session(QByteArrayLiteral("KQuickMail Kernel"), this);

    // TODO initialization of the model

    // Loading state change handler
    if (Akonadi::ServerManager::isRunning()) {
        m_loading = false;
    } else {
        connect(Akonadi::ServerManager::self(), &Akonadi::ServerManager::stateChanged,
                this, [this](Akonadi::ServerManager::State state) {
                    if (state == Broken) {
                        qApp->exit(-1);
                        return;
                    }
                    bool loading = state != Akonadi::ServerManager::State::Running;
                    if (loading == m_loading) {
                        return;
                    }
                    m_loading = loading;
                    Q_EMIT loadingChanged();
                    disconnect(Akonadi::ServerManager::self(), &Akonadi::ServerManager::stateChanged, this, nullptr);
                });
    }
}

bool QuickMail::loading() const
{
    return m_loading;
}

Session *QuickMail::session() const
{
    return m_session;
}
If the application fails to start Akonadi, it simply quits. A real application should probably tell the user about that, though.
Setting Up the Mail Folder Navigation
To make them easier to use, mail apps often organize the emails in multiple folders: the inbox folder, the spam folder, the sent folder, etc. Here we set up code to allow us to display folders in the user interface.
CMake
Akonadi at its core, is a cache layer, and Akonadi and the application communicate using a special protocol. To make our lives easier as app devs, the Akonadi client library provides pre-built models to access the data stored in it without writing low-level protocol code.
In fact, there's a super-specialized set of models specifically designed for email available in a library: AkonadiMime, which connects Akonadi and KMime to provide models convenient for mail apps, like the one we are writing.
First, we need to add two new KDE PIM libraries in the CMakeLists.txt:
find_package(KF5AkonadiMime ${LIBKDEPIM_VERSION} CONFIG REQUIRED)
find_package(KF5Mime ${LIBKDEPIM_VERSION} CONFIG REQUIRED)
To properly link the additional libraries, add KF5::Mime and KF5::AkonadiMime to the source directory's src/CMakeLists.txt in the target_link_libraries call.
target_link_libraries(quickmail
    ...
    KF5::Mime
    KF5::AkonadiMime
)
C++ Folder model
In quickmail.h we need to add three Q_PROPERTY. loading will tell our QML view if the model was loaded and descendantsProxyModel contains the tree model of the mail folders.
#pragma once

class KDescendantsProxyModel;

....

class QuickMail : public QObject
{
    Q_OBJECT
    Q_PROPERTY(bool loading READ loading NOTIFY loadingChanged)
    Q_PROPERTY(KDescendantsProxyModel *descendantsProxyModel READ descendantsProxyModel CONSTANT)

public:
    ...
    KDescendantsProxyModel *descendantsProxyModel() const;

private:
    ...
    KDescendantsProxyModel *m_descendantsProxyModel;
};
Note
To work, this example will also require you to implement the getter for the newly createdQ_PROPERTY.With that, we can now extend the QuickMail constructor to also create the models.
The first thing we will is to create an Akonadi::Monitor . This is a crucial step in setting up the model. We are using it to determine which information we want to fetch and keep track of, and it will also emit signals when the collection is changed in any way. To keep the example simple, we are using a simple monitor that fetches all of the available information.
    ...
    m_session = new Session(QByteArrayLiteral("KQuickMail Kernel ETM"), this);

    auto monitor = new Monitor(this);
    monitor->setObjectName(QStringLiteral("CollectionMonitor"));
    monitor->fetchCollection(true);
    monitor->setAllMonitored(true);
The next step is to create the main data model using an
Akonadi::EntityTreeModel
. This contains all the items and collections inside Akonadi. However, since for this application we only want to displays emails, we will need to filter out data types we aren't interested in. We are looking for MIME messages, or in terms of MIME type, "message/rfc822" (the MIME type is conveniently provided by KMime::Message::mimeType()). This kind of filtering is conveniently supplied in the form of a proxy model called
Akonadi::CollectionFilterProxyModel
.
    auto treeModel = new Akonadi::EntityTreeModel(monitor, this);
    treeModel->setItemPopulationStrategy(Akonadi::EntityTreeModel::LazyPopulation);

    auto entityTreeModel = new Akonadi::CollectionFilterProxyModel();
    entityTreeModel->setSourceModel(treeModel);
    entityTreeModel->addMimeTypeFilter(KMime::Message::mimeType());
To use the tree model in a QML view, it needs to be converted to a list first. This is where KDescendantsProxyModel is handy. It's a proxy model that will turn a tree model into a list model while providing some information like indentation or the collapse status of the items. This makes it possible to implement a tree view in QML.
    // Proxy model for displaying the tree in a QML view.
    m_descendantsProxyModel = new KDescendantsProxyModel(this);
    m_descendantsProxyModel->setSourceModel(entityTreeModel);

    // Loading state change handler
    ...
Don't forget to register the KDescendantsProxyModel in the main.cpp file.
qRegisterMetaType<KDescendantsProxyModel*>("KDescendantsProxyModel*");
The User Interface
In the QML file located at src/content/ui/main.qml, we remove the default mainPageComponent and add the following code instead:
content/docs/use/akonadi/using_akonadi_applications/src/contents/ui/main.qmlRun
python3 scripts/extract-plasma-applet-config-keys.py to fix.This will create a small loading page and will react to the loading signal we created previously.
The next component is the actual UI of the mail folder selector page:
content/docs/use/akonadi/using_akonadi_applications/src/contents/ui/main.qmlRun
python3 scripts/extract-plasma-applet-config-keys.py to fix.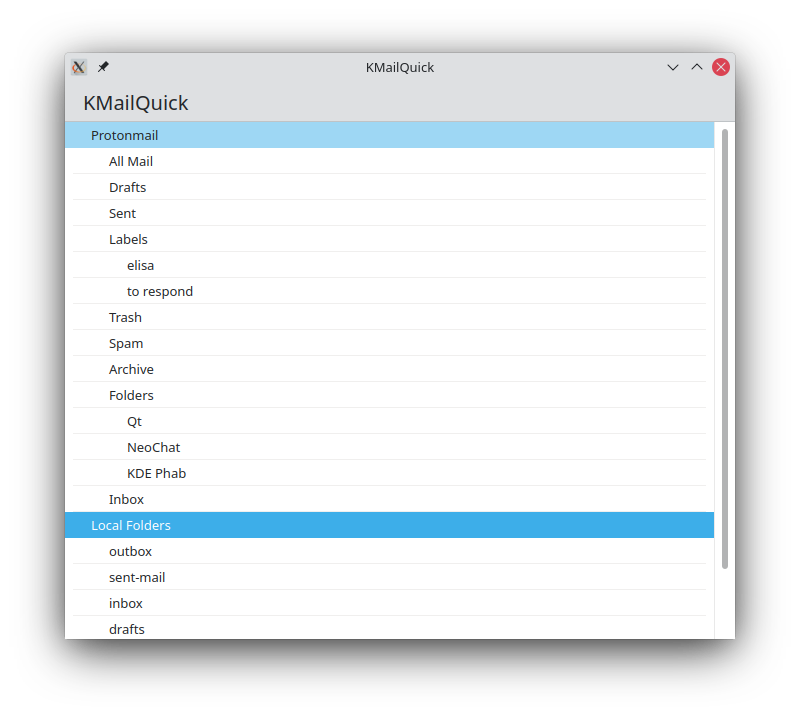
Note
You can get a better tree view using Kirigami Addons.The List of Mails
The next step in our minimal mail client is implementing the inbox view.
Let's go back to the QuickMail constructor and add a mail list model. We use a QItemSelectionModel with an
Akonadi::SelectionProxyModel
to handle the selection of a folder and loading its content.
    // Setup selection model
    m_collectionSelectionModel = new QItemSelectionModel(entityTreeModel);
    auto selectionModel = new SelectionProxyModel(m_collectionSelectionModel, this);
    selectionModel->setSourceModel(treeModel);
    selectionModel->setFilterBehavior(KSelectionProxyModel::ChildrenOfExactSelection);
This requires adding a new property to the QuickMail class: QItemSelectionModel *m_collectionSelectionModel;
The selectionModel will include all the items inside the selected collections. This might not only include emails so we need to filter it with an EntityMimeTypeFilterModel . This is a simple proxy model that filters according to inclusion and exclusion based on MIME types. We only need to display emails ("message/rfc822") and also tell the proxy model to exclude sub-collections.
    // Setup mail model
    auto folderFilterModel = new EntityMimeTypeFilterModel(this);
    folderFilterModel->setSourceModel(selectionModel);
    folderFilterModel->setHeaderGroup(EntityTreeModel::ItemListHeaders);
    folderFilterModel->addMimeTypeInclusionFilter(QStringLiteral("message/rfc822"));
    folderFilterModel->addMimeTypeExclusionFilter(Collection::mimeType());
The current model doesn't expose roles to the QML engine so we need to add another proxy model to expose 2 roles to the QML view: title and sender. We will call this model MailModel.
    // Proxy for QML roles
    m_folderModel = new MailModel(this);
    m_folderModel->setSourceModel(folderFilterModel);

    // Loading state change handler
    ...
Let's now create the new MailModel. In src/mailmodel.h, include the following content:
#pragma once
#include <QIdentityProxyModel>

class MailModel : public QIdentityProxyModel
{
    Q_OBJECT
public:
    enum AnimalRoles {
        TitleRole = Qt::UserRole + 1,
        SenderRole,
    };
    explicit MailModel(QObject *parent = nullptr);
    QHash<int, QByteArray> roleNames() const override;
    QVariant data(const QModelIndex &index, int role = Qt::DisplayRole) const override;
};
In src/mailmodel.cpp, we add the actual implementation of the proxy model.
This is rather straightforward, as an Akonadi collection is a list of
Akonadi::Item
, with the Item containing the data we are interested in.
In the case of emails, it will contain a
KMime::Message::Ptr
, but for example for calendars, it will contain KCalendarCore::Incidence.
Getting the KMime::Message from the Item is simply done using item.payload<KMime::Message::Ptr>().
We can then expose the properties of the message to the model.
QVariant MailModel::data(const QModelIndex &index, int role) const
{
    QVariant itemVariant = sourceModel()->data(mapToSource(index), Akonadi::EntityTreeModel::ItemRole);

    Akonadi::Item item = itemVariant.value<Akonadi::Item>();

    if (!item.hasPayload<KMime::Message::Ptr>()) {
         return QVariant();
    }
    const KMime::Message::Ptr mail = item.payload<KMime::Message::Ptr>();

    switch (role) {
    case TitleRole:
        if (mail->subject()) {
            return mail->subject()->asUnicodeString();
        } else {
            return QStringLiteral("(No subject)");
        }
    case SenderRole:
        if (mail->from()) {
            return mail->from()->asUnicodeString();
        } else {
            return QString();
        }
    }

    return {};
}
Note
You will also need to implement the constructor and theroleNames methods, and then add the file to your CMakeLists.txt configuration, to make this example work.Don't forget to register the MailModel in the main.cpp file.
#include "mailmodel.h"

    ...
    qRegisterMetaType<MailModel*>("MailModel*");
Selecting a collection
The model initialization is now done and the last remaining part left to create in the C++ code is handling when a user clicks on a mail folder. For this we add a new method to QuickMail: Q_INVOKABLE loadMailCollection(const int &index);. This implementation calls select with the original folder's index inside the treeModel.
void QuickMail::loadMailCollection(const int &index)
{
    QModelIndex flatIndex = m_descendantsProxyModel->index(index, 0);
    QModelIndex modelIndex = m_descendantsProxyModel->mapToSource(flatIndex);

    if (!modelIndex.isValid()) {
        return;
    }

    m_collectionSelectionModel->select(modelIndex, QItemSelectionModel::ClearAndSelect);
}
The User Interface
Building upon our previously built UI, we will fill the onClicked handler for the folderListView. This will call loadMailCollection we created previously to load the emails and then create the view containing the list of emails.
    onClicked: {
        QuickMail.loadMailCollection(model.index);
        root.pageStack.push(folderPageComponent, {
            title: model.display
        });
    }
The list of mail component is a simple ListView using the QuickMail.folderModel model.
And finally, the last component displays the list of emails.
content/docs/use/akonadi/using_akonadi_applications/src/contents/ui/main.qmlRun
python3 scripts/extract-plasma-applet-config-keys.py to fix.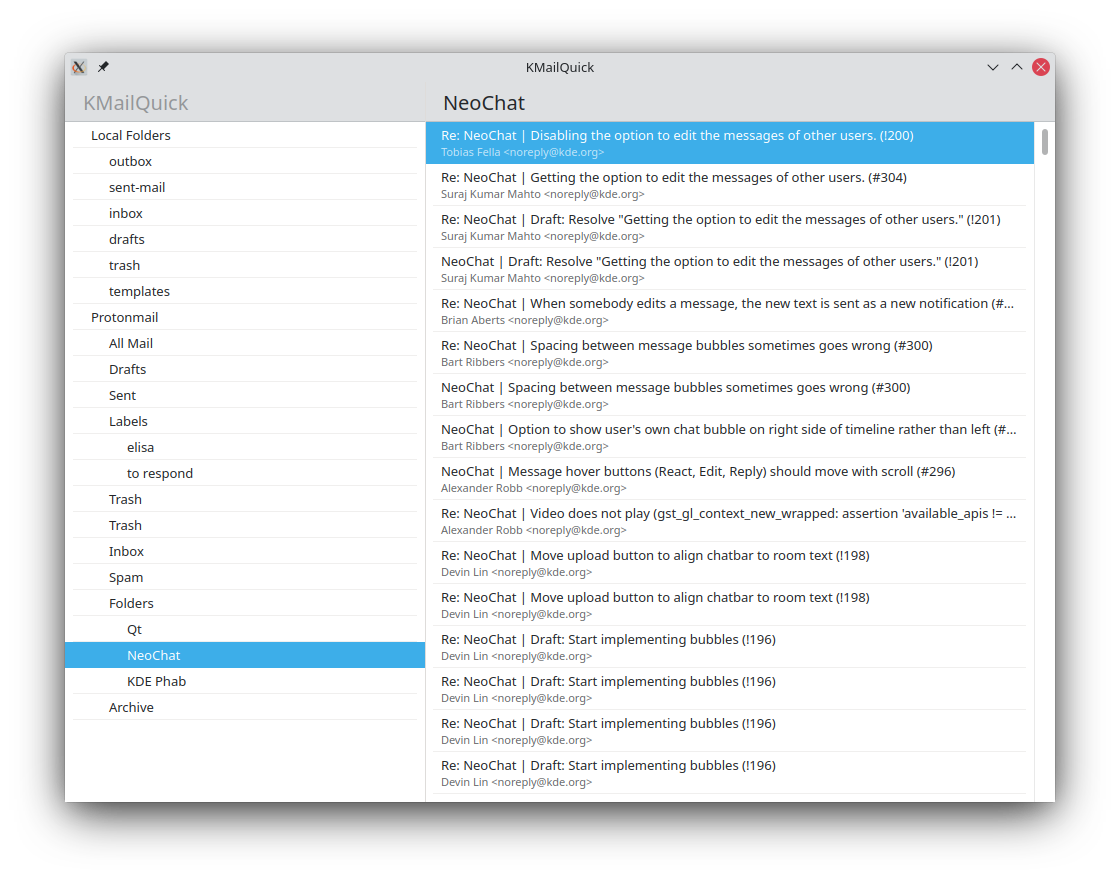
Making the Model Faster
You've probably noticed that when the application loads, it often freezes for a few seconds. This is because we are using a simple monitor that loads everything, including all the data we don't need. To make it faster, we should only load the information we need to display the mail list: the subject, the sender and the date. We could configure the monitor ourselves, but instead, we will use the premade MailCommon::FolderCollectionMonitor from the MailCommon library.
#include <MailCommon/FolderCollectionMonitor>

QuickMail::QuickMail(QObject *parent)

    ...

    m_session = new Session(QByteArrayLiteral("KQuickMail Kernel"), this);
    auto folderCollectionMonitor = new MailCommon::FolderCollectionMonitor(session, this);

    auto entityTreeModel = new Akonadi::CollectionFilterProxyModel();
    entityTreeModel->setSourceModel(treeModel);
    entityTreeModel->addMimeTypeFilter(KMime::Message::mimeType());
We also need to add MailCommon to our dependencies now.
# CMakeLists.txt
find_package(KF5MailCommon ${LIBKDEPIM_VERSION} CONFIG REQUIRED)
# src/CMakeLists.txt
target_link_libraries(kmailquick
    ...
    KF5::MailCommon
)
A Mail Viewer
The last (and probably most important) feature in an email viewer is displaying emails.
Before using FolderCollectionMonitor, we could have simply called message->textContent()->decodedText() on a KMime::Message to get the content of an email.
Unfortunately, now that we are only fetching the minimal information that we require from Akonadi to display an email list, this isn't possible anymore.
Instead, we'll need to fetch the email's content on-demand.
To make our code a bit cleaner, we will wrap the mail content inside a new class: MailWrapper. This class will be responsible for fetching all the information about the mail we want to display.
content/docs/use/akonadi/using_akonadi_applications/src/messagewrapper.hRun
python3 scripts/extract-plasma-applet-config-keys.py to fix.The constructor of the MessageWrapper will fetch the content of the message in case the Item is empty. It's using a
Akonadi::ItemFetchJob
that is created inside the createFetchJob method. When we get the full item, we emit a loaded signal to update the UI.
content/docs/use/akonadi/using_akonadi_applications/src/messagewrapper.cppRun
python3 scripts/extract-plasma-applet-config-keys.py to fix.In createFetchJob, we need to create the
ItemFetchJob
and define its scope.
The scope specifies which parts of an item should be fetched from Akonadi.
We ask for the full payload, the parent collection, and possible related content.
content/docs/use/akonadi/using_akonadi_applications/src/messagewrapper.cppRun
python3 scripts/extract-plasma-applet-config-keys.py to fix.Reading the content of the mail is then done by calling the appropriate methods from the KMime::Message. Similarly, the other properties can be implemented as wrappers around KMime::Message. For more details, you can take a look at the complete implementation.
content/docs/use/akonadi/using_akonadi_applications/src/messagewrapper.cppRun
python3 scripts/extract-plasma-applet-config-keys.py to fix.To make this work, we need to transform the QuickMail class into a singleton, since we need to access the session when creating a job.
// src/quickmail.h

class QuickMail : public QObject
{
    ...
}

Q_GLOBAL_STATIC(QuickMail, quickMail)
Then, in mail.cpp, we change how QuickMail is exposed to the QML engine.
// src/main.cpp

int main(int argc, char *argv[])
{
    ...
    qmlRegisterSingletonInstance<QuickMail>("org.kde.quickmail.private", 1, 0, "QuickMail", quickMail);
Finally we need to create the wrapper and for that, we create a new role in MailModel called "mail".
    case MailRole:
        {
            auto wrapper = new MessageWrapper(item);
            QQmlEngine::setObjectOwnership(wrapper, QQmlEngine::JavaScriptOwnership);
            return QVariant::fromValue(wrapper);
        }
The User Interface
In the previously included folderPageComponent, we can now fill the onClicked handler:
    root.pageStack.push(mailComponent, {
        'mail': model.mail
    });
The mail viewer component is also a Kirigami.ScrollablePage, and we use a TextArea component to display the content.
content/docs/use/akonadi/using_akonadi_applications/src/contents/ui/main.qmlRun
python3 scripts/extract-plasma-applet-config-keys.py to fix.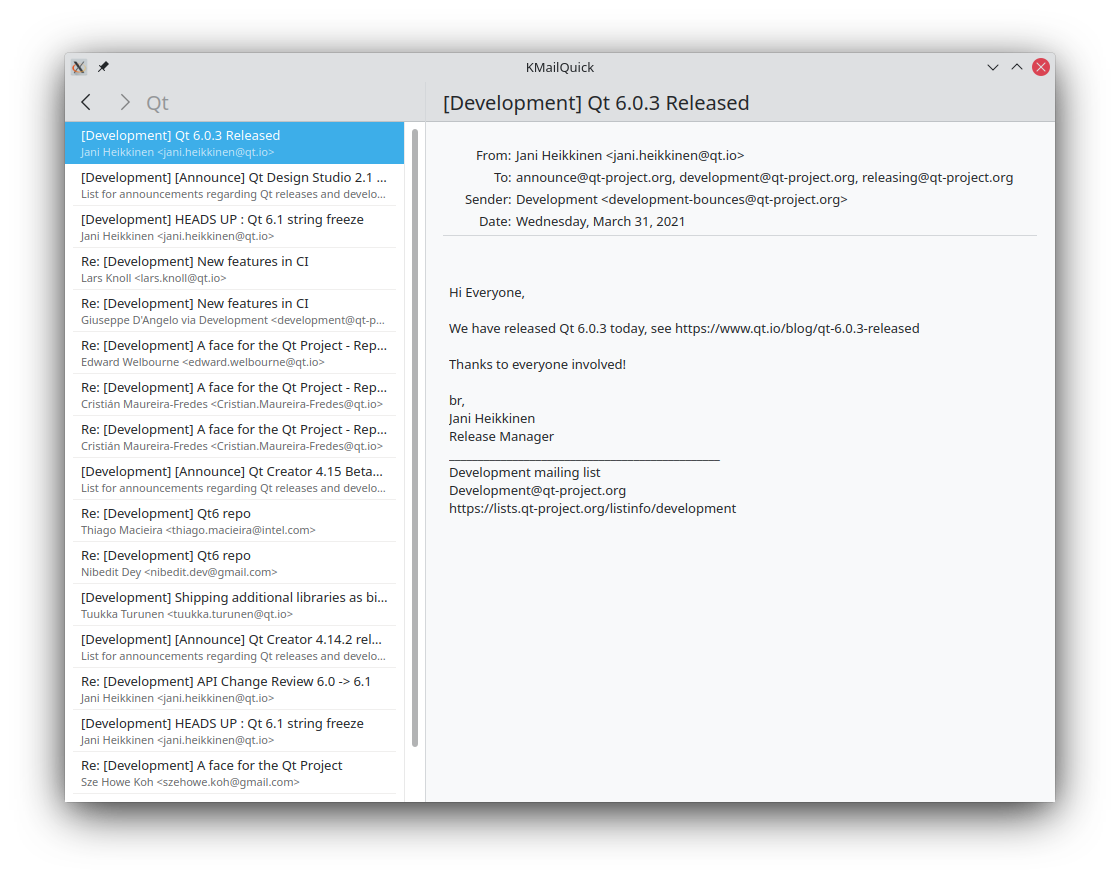
Downloading the project
This tutorial glossed over some of the more technical details. If you are interested in poking around, you can download a complete and working version of the example here.